« Posts under Misc Info

Selfies in Flight

Given all the hullabaloo regarding selfies in flight brought on by this incident, I thought I’d share my thoughts on a few things.

First, the actual flight that crashed had no record of the pilot taking pictures.   That happened on the flight BEFORE the crash, meaning he went up, his pax took a bunch of flash pictures at night in bad weather (not smart), but managed to land safely.  The NTSB is assuming the behavior on the previous flight happened on the incident flight as well.   From the article,. what is evident is that the pilot took off in bad weather at night, became disoriented, stalled the aircraft, and hit the ground at a high rate and angle.   The hubbub is a perfect storm of the NTSB engaging in raw speculation, a public conditioned for decades to fear airplanes, and a popular trend in social media.

Second, after some research (granted, not  much) there is nothing in the Part 91 FARs prohibiting use of a camera in the cockpit, either by the pilot or passenger.   It may be a bad idea in certain situations, but it’s one pursued at the pilot’s discretion, and that’s how it should be.

Aviators go through extensive training and live under the banhammer of the FAA to achieve one primary goal:  The safety of the non-participating public from an activity that we do voluntarily.   It is the duty of the pilot not to subject people or property to unnecessary risk.  Every aviator makes that call on every flight, and the choice to do something or not do something based on risk are what we like to call personal minimums.   For instance, if the airspace is crowded, the radio is busy, or I’m otherwise in a situation of high pilot workload, pulling out a camera is probably not a good idea, and in those situations, taking photos is below my personal minimums.

However, if I’m cruising in an empty sky, in contact with ATC, and at a high enough altitude, I think it’s OK to take a few shots.   After all, it’s the only way I have to share what’s outside my window with all of you.

Update:  I’d like to point you to this extremely informative article by Bob Collins, which says pretty much what I said, except a whole lot clearer and better.


RV-7 Checkout Complete

11.5 hours.

Success.   I got my checkout in the RV7.   This is less a testament to my skill as a pilot than to Mike Seager’s skill and patience as an instructor.   We did have some interesting days.   Departure from 05S was IFR on Friday and Saturday.   We shot the localizer approach to Scappoose (KSPB) and got in under the ceiling so we could do pattern work.

My last post was done on an iPhone, so it’s a bit sparse on details, but this is the meat of it:

Pattern work in the RV7, with my current pilot skills and experience, was an intense, sometimes terrifying experience.   My repertoire of flying machines consists of a few Cherokee variants, a C172, a C152, and recently, a 115hp Citabria.   The pace of flying the Pipers and Cessnas in the pattern is a relaxed, almost languid affair, with plenty of time between procedures to really settle in.   The Citabria less so, because we always do power-off approaches.   Not so at all with the RV.    That was like being a short-order cook in the busiest diner in town.  Stuff happens FAST.

The takeoff, which I sucked at in the beginning, is some work.  The left-turning tendencies of the RV 7 are pretty intense.    The Citabria only has 115hp, so the torque, P-factor, and rotating slipstream aren’t as bad.  They’re there, but it doesn’t take much to correct them out.  Gyroscopic precession is less, because the Citabria’s prop weighs less.

But the RV is tricksy.  To get that thing off the ground in anything resembling a straight line, it requires a lot of right boot.   As soon as you light up the throttle, it wants to head for the bushes, and you better be on top of it or you’re going to have problems.  At the same time it wants a lot of right boot, it wants really small corrections.   It’s really easy to get a left-right PIO going while you’re hunting for the centerline, and as soon as you get that together, the tail comes up and it wants to wiggle again.  Then the bad habits take over, like pushing the stick to the right, thinking that’ll fix everything.

It won’t.

In fact, the adverse yaw will make it turn left even more, so you’ll compensate for that with more right rudder.   By that time, the plane is already headed for the weeds, and it’s nearly ready to fly; in fact, it’s been ready to fly for a while, but you didn’t get the memo because you were still trying to figure out what magic farking combination of control inputs will put this bucking bronco back on the straight and narrow.  You wind up crow-hopping across the runway slightly sideways, waggling into the air, one wing low.   To the casual observer, the overall effect is that of a pelican who has recently gulped down a beak full of absinthe.

Assuming you get it into the air, and you will, because Mike won’t let you do anything truly horrible, you must now manage your climb.   Check engine instruments, pitch to 110mph, MAP to 25″, RPM to 2500.  What’s that?   You never used a constant speed prop before?  Oh boy are YOU in for  a treat.   Never used an EFIS/EIS in flight before?  This is going to be fun.   Actually, it’s not that bad.  The only thing that made me nervous was how much time I was spending inside the cockpit squinting at the tiny numbers for MAP and RPM.  I like knowing my RPM by the sound of the engine, because that leaves my eyes free to get my sight picture, but that can only come from practice and familiarity with the airplane.

Once you’ve established climb, pull the power back to 2500RPM, then just twist the prop control CCW until you hear the engine sound change.   Chances are, you’ll be close enough to 2500 rpm to count.

At 700′ you turn crosswind.   Our traffic was right closed, so it required more right rudder than if we’d gone the other way, where you can be lazy and let all the left-turning forces do a bunch of your work for you.   Here you need to do a couple of things, possibly simultaneously.   At 900′, start leveling off, dial power back to 16″ and set the prop RPM to 2300RPM.  Again, just listen for it.   It might take a few extra twists.  Oh, and while this is going on, you may or may not be turning.   It’s assumed you can turn and manage your altitude at the same time.   This is not easy at first, but it becomes less difficult with practice.

Pattern altitude at KSPB is 1000 feet.  16″/2300RPM should keep you there nicely, burbling along at a stately 120mph.  At this point, you’re almost in Piper/Cessna territory.   The downwind turn should happen wherever it’s supposed to, which means you should be far enough in the crosswind direction to turn and put your right wingtip on the runway.  You might still be climbing.  You might not.  It’s that whole walking-and-chewing-gum-at-the-same-time thing.

Once you’re leveled off at 1000′ and on the downwind leg, it’s time for downwind checks.   Fuel to fullest tank, carb heat hot, (mine’s fuel-injected, I won’t be doing that), boost pump on.   Make sure we’ve got good readings on the EIS for oil and fuel pressures, and temperatures.   If you’ve done this right, and you don’t spend a lot of time hunting for power and trim settings, you might, just might, have a little breathing space before you need to set up your approach to landing.

Approach is set up on the downwind leg, abeam the instrument landing marks.   Those would be the two big white stripes just after the numbers on the runway.   This is where it gets interesting, because you now have to change a bunch of things inside the cockpit without changing the attitude of the airplane.   Here, you throttle all the way back to idle, keeping the nose up, because what you want to do here is slow down enough so you can use your flaps.  This is also when you push the prop control back against the wall, because your engine management will now be based on RPMs instead of Manifold Air Pressure.    Vfe is 100mph in the RV7, so as soon as it slows down below that, you can drop the flaps to half.   Using the standard Van’s flap motor, that’s roughly a 4-count.   Not 1-Mississippi, but one, two, three, four.   When you’ve slowed down to 85mph, push the throttle back up to 1800RPM.   If you’re going 85mph and your RPM is 1800, you should be descending at 500′ per minute.   85mph is the best glide speed for the RV7 and should put you right in the pocket for a landing, assuming you get the next part right.

When you’re at a 45 degree angle from the end of the runway, turn base.   On the base leg, drop your flaps to full.   If you don’t, you’ll blow the approach, and you’ll come in too fast, too high, too low, or too slow, maybe some combination thereof.   It will take a few runs at it, but if you forget the second notch of flaps, it will feel weird.  Pitch will be wrong, speed will be wrong, and if you’re lucky, you’ll be able to figure out what’s making the approach feel weird before it’s too late to do anything about it and you have to go around.   One thing I learned is that a good approach goes a long way towards a good landing, and even though it took me most of 3.5 days to figure this out (having had it explained to me repeatedly by a very patient flight instructor), I can attest to the veracity of this concept.     A good approach also means you don’t have to run the throttle all over the place to maintain your desired angle.  Yes, pitch to speed, power to altitude and all that, but the desired outcome here is a smooth transition from being aloft to not being aloft and if your approach is good, you won’t be hunting for the right glide path.

And then there’s the landing.   The RV7, with its stubby, Hershey-bar wing, has a steeper glide than the C172 or the Cherokee, and the constant speed prop acts like a brake as well.   This is why you might want to carry some power across the threshold.   Why?   I’ll get to that in a second.

I think we can all agree that landing the aircraft is one of the most important tasks a pilot must perform.   When I started with Mike, the thing I was doing to get the plane onto the ground could only be called “landing” in the most generous terms possible.   I’ve gotten half decent at landing Mickey’s Citabria.   matter of fact, I think I could go out there and pull off 5 out of 5 right now with no go-arounds.    I thought that when I started with Mike on Wednesday.

Well, the RV ain’t no Citabria.  There is a tiny window in which you can transition from gliding descent to leveling off into ground effect, and if you blow it, you’re going to drive it into the runway and bounce off the main wheels.  That’s if you don’t hit so hard you spread the gear out and strike the prop.   Of course, the fear of this very situation will cause you to land on an imaginary runway that’s 20 feet in the air.   You need to get low and level off.  Low.  Like, lower-than-snake-shit low.

Once you’ve made the runway, you cut power to idle, but don’t let the nose drop.   Don’t yank it up like the head of the old nag you rode to town on either.   Pull it up level.   Maybe you leveled off too high.  Very very small corrections, lower the nose a bit, then level off again.  Get down there.   If you carried some power and a little extra speed over the threshold, you have some time to make these corrections.   “Some time” means you have one or two opportunities to fix what’s broken, and that’s not a lot of time at all.   if you touch the front wheels first, you’ll bounce, the classic tailwheel balloon.  if you flare too early, you’ll balloon back into the air and slow down.   You can fix this by lowering the nose a little, and if you’re carrying speed, you can save it.  If not, it slows down too much, then it just stalls 10 feet in the air and drops to the runway like a sack of skulls.

The other thing that makes this interesting is that the stall attitude is actually higher than what it’s at sitting on all 3 wheels.   This means you can’t see over the nose when you flare for landing.   You shouldn’t be doing that anyway.  You should be hanging your head out to the left and finding a spot way down at the end of the runway so you can judge how high you are.   I picked up the bad habit of looking over the nose, because in the Citabria, I can see over the nose when it’s in stall attitude.   Once I figured out how to look down the left side of the cowl for my reference point, my “landings” became landings, with no quotes.   They’re still not greasers, but they’re safe enough at this point, but like Mike says, don’t be satisfied with “good enough.”  Always do better.

Oh, and for all you noob pilots out there, I highly recommend William K Kershner’s excellent book, The Student Pilot’s Flight Manual.  Mike sent me home with it during my stay there, and I’m truly converted.   I got more out of that than any other flying text I’ve seen.  It’s also fun to read and the illustrations are clear and instructional.

I want to say a huge thanks to Mike Seager for three of the most challenging and rewarding days of my thin flying career, and for teaching me several new ways to look a the tasks of flying.

Flight Training

Yesterday began the actual odyssey of flight with the RV-7. Mike Seager has been teaching transition to the RV series for a long time and I’m the current beneficiary of his skill and knowledge.

I’m currently learning in his plane:

20131024-194442.jpg

We cleared ourselves to take off through the fog (you can do this at uncontrolled airports, apparently) then punched out and headed for Hillsboro.

I thought after flying the Citabria for a while, I’d have this nailed, but no, not even close. The RV with constant speed prop is a completely different animal. There’s a lot to do very quickly: it’s very easy to get behind this airplane, especially with the added workload of the constant speed prop and the fact that it climbs like a rocket.

20131024-195220.jpg

The EFIS is another twist. Mine is different and I kept relying on the steam gauges rather than the display. So pitch/power/trim/heading was a handful and I’m less than satisfied with my performance in that regard.

Ground ops are different from the Citabria as well. Way more emphasis is placed on differential braking than rudder control and feet come off the floor for braking, which I’m not used to. Mike has you brake instead of eating up a load of runway on landing.

Speaking o which, I need work on landings. One thing different about this plane is that I can’t see over the nose in stall attitude. I can in the Citabria, so that’s given me the bad habit of trying with the RV. It doesn’t work.

On the plus side, we took a little side trip to the Van’s Aircraft factory in Aurora. The Mothership!

20131024-202747.jpg

20131024-202756.jpg

20131024-202810.jpg

Then we went back to Vernonia for debrief. More tomorrow.

Dragging the tail.

Friday afternoon, I went down to TOA to meet with Mickey Holton, an instructor recommended to me by Matt at MGL a while back.  Mickey teaches tailwheel flying, “real flying” as he calls it and I tend to agree.    After a briefing and a look over my logbook, we fired up the green Citabria and went for a flight.


20130810-202555.jpg

We left Zamperini Field and flew over to Compton for some landing practice..  LOTS of landing practice.   We did 7 landings, none of which were any good, except the first one Mickey did to demonstrate the technique.  But I did better than Mickey expected me to.  Mostly, the issues I have relate to the fact that there is no bullshitting the Citabria.  You either fly it properly or you get your ass handed to you.

It has very low wing loading.  It’s super light and very responsive, a true sport plane.   Not very fast or powerful, but it has retained a lot of things that were mostly designed out of the Cherokees I learned to fly in.   For example, adverse yaw in this airplane is a killer.   If you move the stick left, the nose swings right, and you need to use those lumps of meat and bone at the ends of your legs to coordinate with left rudder.   Not only that, if you move the stick to either side in takeoff roll or landing, the nose swings and sets you up for a really gnarly ground loop.   In the Cherokee, the ailerons are designed to counteract this a little by placing a little more drag on the down side.   The RV is similar, but not as pronounced.

And of course, there’s the tailwheel configuration itself.  On the ground, once turning, a tailwheel aircraft keeps turning, unless you stop the turn with opposite rudder, and the landing is where this is most likely to nail you.  You can stick the landing then drift off into the weeds when your mind moves the stick for you and not the pedals.

There will be some unlearning of habits and some learning of new ones, but Mickey’s a great instructor and he’s been doing this forever.    Someday, i’ll be able to land this airplane without rolling it into a ball.

I like to move it move it. Moving Day, Part 2

4.5 hours.

Moved!

David arrived at 8AM this morning and we drove the loaded truck up to Oxnard. This was not a fast trip, and the seams in the 405 freeway are exactly the same distance apart as the distance between the front and back wheels, so anything over 40mph made the truck bounce like mad. Once we got to the 101, it was much better, but it was still slow going.

Once at the Oxnard airport we made our way to hangar C38, where my plane is now getting to know its new roommates; a yellow Luscombe and an RV-9 slider under construction.

20130505-100350.jpg

20130505-101156.jpg

20130505-101221.jpg

I like to move it move it: Moving Day part 1

7.5 hours.

Today is The Big Day, Part 1:   Moving to the airport.   This morning, I finished up the crotch strap bracket on the left side.   The right side, not so much.   I didn’t even get into it because I knew it’d take far longer than I had, and I wanted to transport the airplane with the interior assembled.    So I finished up the bracket, then started prepping the house for the impending load-out.

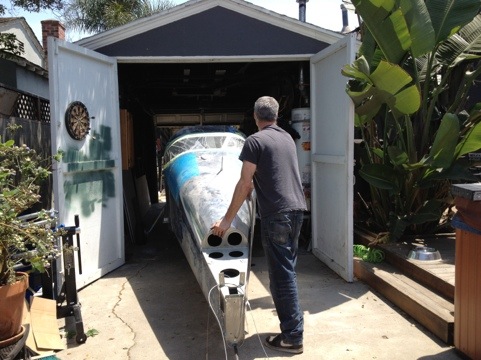
20130504-105023.jpgThis RV7 stands 7’2″ wide from axle nut to axle nut.  The garage doors are nearly 8 feet wide, but the issue is the hot water heater stand.   It pokes out into the space about a foot.  What it does is reduce the available pathway from around 8 feet to 7’1″ and that’s a showstopper.   So being clever (never confuse clever with smart.), I jacked up the heater stand, took off the inside legs, and supported it with jack stands.  This allowed the right wheel enough room to get the camel through the eye of the needle.

20130504-105102.jpgThis might look unsafe, but it’s not; there are huge metal straps holding the tank against the wall.

20130504-105123.jpgRemoving the washer, dryer, and guest house range revealed the mess the guys left when they demoed the bedroom walls.   Nasty.

David arrived at 11am, and when I finished getting crap out of the way and zipping up the interior, we headed over to Marina Boat and RV storage to pick up the cube truck.   I had originally booked a 22′ truck with a lift gate.  This one is a 24 footer;  and we definitely needed the extra two feet.

20130504-120539.jpgThis is without a doubt the largest vehicle I have ever driven.   I need to look up the stats, I don’t know if they were supposed to rent me this without a CDL.   But oh yes, it has a lift gate.

Paulus and Ellen arrived around 1:30 and with both Paulus and Dave helping, we got the tool chest, the workbench and the plane onto the truck in less than an hour, mostly thanks to that lift gate.  The lift gate is both brilliant and dangerous: It has the potential to mangle appendages, crush bones, pinch skin, and ruin your stuff.   David said that on a film set, something like 30% of all injuries are caused by folding lift gates like the one on this truck.  Whatever, it’s totally worth the risk.   That thing is genius.     The tool chest and workbench were just a warmup for the main event: the fuselage.   That was interesting.   We had to make lots of weird little turns to get the thing out of the shop and into position where it could roll toward the little garage.   At least I didn’t have to knock the wall down to get the thing out.  Some builders have.

GPS_TestOnce the ship was under open sky,  I fired up the avionics.    This has plagued me for months:   Did I wire the ARINC429 communication between the EFIS and the GNS430 correctly?   Did I install the GPS antenna properly?   For the first time since I’ve owned it, the GNS430 locked on to a satellite constellation and began speaking to the EFIS, so yeah, I’m awesome.

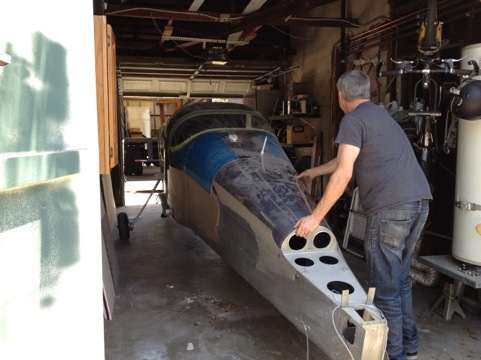
20130504-193443.jpgWith tests complete, we started rolling the plane toward the lift gate.   Shelley took some shots, which is nice, because I wasn’t about to stop and do it.   At this point, we’ve just made it past the hot water heater.

20130504-193507.jpgLining up on the exit…

20130504-193518.jpgMoving forward, at a pace reminiscent of the giant crawler NASA used to move the Shuttle to the launch pad.

20130504-193533.jpgThe lift gate made this dead easy.   All we had to do was get the main gear as far forward as we could, then I lifted the tail while David raised the gate.  After that, it just rolled right in.   This is why you use the Penske trucks instead of the U-Haul: there are no wheel wells or fuel tube humps to deal with.   The truckbed is flat and made of wood, so you can do things like screw 2×4’s into it with deck screws.

The rest of it was what Dave called “Tetris: Homebuilt Aircraft Level.”   The rest of it was us loading, strapping, and securing.   Oh, and we forgot the prop, so we had to shuffle some things once we remembered the giant wooden prop box skulking in the corner of the shop.

We knocked off around 5 and buttoned up the truck.   I had dinner, walked the giant furface you see in the first pic, then put everything back that I’d extracted from the garage earlier to make way for the airplane.   Now I’m beat, my feet hurt, and I’m going to go sit in the hot tub.   Tomorrow, we hit the road at 8:00AM.

Ready to move!

12 hours.

That’s right, yesterday and today, twelve hours. Putting on and taking off those covers is time-consuming, and along the way I discovered a bunch of little tasks I’d blown off until later. Well, later is now. So as I went along, I remade the right side fuel line so it fits better with the cover panel, I moved the Adel clamp on the return line under the tunnel cover, and I dressed the antenna cables on the left side. I’ll need to do the left fuel line as well, I think, but I have something there that works.

Mostly I wanted to get everything bolted, screwed, taped, and riveted onto the airplane that I could, to facilitate transportation to the hangar. There are about million things I’m going to have to box up and move or otherwise account for. If it’s on the airplane, installed where it’s supposed to go, I don’t have to worry about finding it later. A good part of that activity was installing the interior. Last night when I quit, I realized I’d have to install a lot of little Velcro hook disks to hold the carpet backing.. The instructions say you can rivet them to the floor panel or you can drill the holes out to 5/32 and use existing floor panel screws to attach them. I took the easy way out and drilled them out to 5/32.

20130428-163459.jpg

As you can see, there are a lot of screws.

20130428-163528.jpg

I didn’t take a lot of pictures of me installing all the Velcro. That’s boring. This is a shot of the Classic Aero Designs interior, installed, with carpeting, side panels, seats, the whole works. Now it looks almost like a real airplane!

20130428-163555.jpg

Another view. This thing is now much more fun to sit in and make airplane noises.

20130428-163715.jpg

This is the baggage compartment, looking aft between the seats. Putting the ‘mental’ in ‘experimental.’

20130428-163729.jpg
Cowling on, canopy on, all skins done, ready for the move to OXR.

There are a few squawks I need to take care of:

1: Fuel pump overflow tube (yes, I still haven’t gotten to that)
2: Anti-chafe for the cabin heat tubing, like UHMW tape
3: End hardware for canopy side hinge pins.
4: Order 5-point restraint system
5: RTV around baffles, baffle-engine case interface, blast tube fittings

Testing iPhone posting

20130420-113025.jpg

So here we go. Finally the iPhone and its apps have caught up with my needs and skills. I give you… The direct post!

Anyway, this is me, riveting the left bottom wing skin on. I’m doing the row just outboard of the autopilot, which you can see in the lower left of frame in that dark compartment.

Going Social

I’ve decided to patch the connection between this site and Facebook, and you can follow the progress (such as it is) on Facebook by liking the Stjohn’s Airplane page.

To do:

Remaining to-do list:

finish cabin wiring
install wet compass and backup attitude indicator
install AHRS mount.
install ELT
wire avionics stack
servo and wing root connectors
install fuel flow sensor
Finish FWF wiring
baffles
oil cooler
snorkel/intake
cowling
gear leg fairings
prop governor
cables and brackets: cabin heat, alt air, fuel purge, throttle, mix, prop pitch.
interior

medical
BFR
paperwork
inspection
tailwheel training
ground testing
first flight
flight testing.