« Archives in May, 2013

The Tall Tail

4 hours.

Finally got the tail on.   After some struggles with the rudder bottom and some adjustment of the bearings to make it swing more freely, I got the rudder on, listening to Larry Niven’s “Draco Tavern” on audiobook.   It’s amazing how well audiobooks pass the time.

The rudder wasn’t the only thing I got done; I installed the tailwheel chains and torqued down the tailwheel attach bolts.   Cannot believe I didn’t do those bolts earlier.  I’m lucky I didn’t find the tailwheel rattling around in the truck once we got to the airport.

The rudder bottom may have to have a few things fixed.  I ate away a lot of glass trying to get it to fit properly, so I might have to build it up a bit. I still owe a couple of wraps of UHMW tape around the strobe and light wires.

The only real struggle came from the trim control wire.  I had to get it to pass through a couple of rubber grommets and make its way to the area forward of the VS spar under the empennage fairing.   This was not fun, but my hangar mate Ron helped out by shining a light inside the HS so i could see to jam the wire into the grommet with the two fingers I could stick through the lightening hole.

Somehow I misplaced the cut-off DB9 connector which would have showed me the pinouts for wiring the two ends of the trim wire together.   I remembered writing it down somewhere, but it wasn’t where I thought it was: I devoted an entry on this website to wiring color codes and pinouts but I didn’t remember that at the time.   I called Shelley to see if I’d written it down on some papers I’d stuck to the cork board in the erstwhile shop and she sent me photos of them, but no joy.   I didn’t think to look on this blog, but searching for stuff like that through an iPhone is no fun.

So that’s that.   Just have to get the the trim wired up and a couple of loose ends and the tail is on and attached.   I pushed the plane out into the sun for a photoshoot before I headed home.

20130531-163048.jpg


20130531-163100.jpg

20130531-163115.jpg

Attaching the rudder.

6 hours.

Today was both  productive and frustrating.   The intent was to finish up all things rudder, which didn’t happen, but got pretty close.

I spent a bit of time making some more clearance between the rudder/elevator tips and their corresponding stabilizer tips.   To get a perfectly matched arc shape, I wrapped successive layers of coarse-grit sandpaper around the tip and counterweight, and swinging the part through its travel sanded the stabilizer tip into the shape I needed.   Easy.   But the main focus of the day was the rudder, both wiring and attaching the rudder bottom.

First thing I needed to do was set up the rudder bottom attach, which involved putting  platenuts on the attach strips so I can remove the rudder bottom later if I need to.  This was a time-consuming process, which does not fit well with my “final assembly” ethic.    It needed to be done, along with wiring the tail lamp and strobe.    That went better than expected, but I had to run a ground wire for the tail lamp, which I’d forgotten to do the whole time I was working on stuff back there.


20130518-124846.jpg

Platenuts.   But not many.

20130518-124907.jpg

I have no idea why I took this shot.   But this is right about when it started to go south.  When I put the vertical stabilizer on, I put it on with the bolt heads on the inside of the fuselage, with the threads pointing aft.   When I put the rudder on and tried to fit the rudder bottom to it, there was no way in hell the rudder bottom was going to fit.   So I started shaving down the fiberglass on the rudder bottom, which helped.   The major issue was that with the bolts pointed in the wrong direction, the rudder bottom interfered with the center bolt.

Now, this is where you’re saying “turn the bolts around, dude.”   If you had said that when I ran into this problem, it would have helped.  But no, yours truly had to do it the hard way.   I removed the rudder, and figured, hey, I’ll just let the rod end bearings, the ones holding the rudder to the stabilizer, out a bit and see if I can clear those threads.   Nope.   Several tries. Nope.   Without my fancy rod-end-bearing tool, even.   Nope.   After a few rounds of this, I smartened up and flipped the bolts around, and everything clears just fine.   But now my rudder is way out of alignment, and even though it travels nicely and freely, there’s  much bigger gap at the bottom than there is at the top and this will not do.

The good news is that the tail lamp works fine, no smoke, no blown fuses.   The strobe doesn’t, but that’s probably because the strobe pack was last switched on and run some time during the Bush administration and the capacitors are hosed.   I’ll be needing a replacement, and soon, because the wings are going to go on and I’ll need to test that all the blinkenlights work.

So for next time, bring the fancy rod end bearing tool (a couple of scrap pieces of PVC pipe).


This weekend coming up

A new to-do/to-bring list for the hangar.

To Bring:

  • Drill
  • Extension cord
  • Power Strip
  • Box with strobe bulbs and tail lamp connector
  • Shop Vac
  • Sailboat shackles to replace lame Van’s tailwheel chain clips (West Marine)
  • Skateboard!  (The porta potty is far.)

To do (once I get there)

  • Torque rudder hinge bolts
  • Mill off enough filler so rudder and elevators travel freely
  • Reprime carved out stab surfaces
  • Pull out interior and store in boxes (Might bring some stuff back home so it doesn’t get filthy)
  • Install Rt side crotch strap bracket
  • Prep for wing install
  • Pull the cowl off so interested parties can have a look and give me squawks about my firewall-forward installation.

Being an hour away from the project does a few things:   It makes you think about what needs doing in the time you’ll have to do it, and it makes you visualize all the steps necessary to get it done.  It also brings home the need to make lists of supplies, tools, and tasks.  The Age of Puttering is pretty much over.  During the week, I should probably be doing paperwork and getting ready for registration and other things.

Pin the Tail on the Airplane

6 hours.

Last night I loaded the Xterra with all the leftover bits and pieces that didn’t get moved last weekend. All the hardware, the small kit parts, various things in various boxes and the elevator push tube all went up to OXR with me this morning. I spent about an hour unpacking and organizing, and intermittently chatting with folks who stopped by. I met my other hangar mate Scott, and I met Jim, who owns the hangar and seems to know pretty much everything about the airport, and is a vast wealth of knowledge about experimental aircraft in general. Once I’d shuffled things around a bit, I committed to installing the empennage, because it’s another one of those things I don’t want to have on shelves or leaning against something.

20130511-194527.jpgHere, I’ve got the horizontal stabilizer and elevators installed. I had actually forgotten to do a rivet on the HS when I rebuilt the front spar attach bracket, so I did that today. The vertical stabilizer and the rudder also went on, but I have to torque the bolts on the rudder. Also, I need to find the linkage for the tailwheel chain, otherwise steering is going to be interesting. Once I got everything installed, I discovered that the layers of paint on the elevator tips brings it into contact with the tip on the HS. Same with the rudder and VS, so there will be some sanding in the near future. It’s not too bad though, and everything else seems to be pretty good.

20130511-194542.jpgHere’s a shot of all the roommates: The Luscombe, the RV9, and my -7.


20130511-194554.jpgThe last thing I did today was connect the push tube back up to the bellcrank. The stick now operates the elevators, and that is as it should be.

Next time, I need to remember to bring an extension cord and a power strip.

Moving Day, Part 2 cont’d.

Some photos from Dave – Loading, loaded, and unloading:

MovingDayCollage

I like to move it move it. Moving Day, Part 2

4.5 hours.

Moved!

David arrived at 8AM this morning and we drove the loaded truck up to Oxnard. This was not a fast trip, and the seams in the 405 freeway are exactly the same distance apart as the distance between the front and back wheels, so anything over 40mph made the truck bounce like mad. Once we got to the 101, it was much better, but it was still slow going.

Once at the Oxnard airport we made our way to hangar C38, where my plane is now getting to know its new roommates; a yellow Luscombe and an RV-9 slider under construction.

20130505-100350.jpg

20130505-101156.jpg

20130505-101221.jpg

I like to move it move it: Moving Day part 1

7.5 hours.

Today is The Big Day, Part 1:   Moving to the airport.   This morning, I finished up the crotch strap bracket on the left side.   The right side, not so much.   I didn’t even get into it because I knew it’d take far longer than I had, and I wanted to transport the airplane with the interior assembled.    So I finished up the bracket, then started prepping the house for the impending load-out.

20130504-105023.jpg
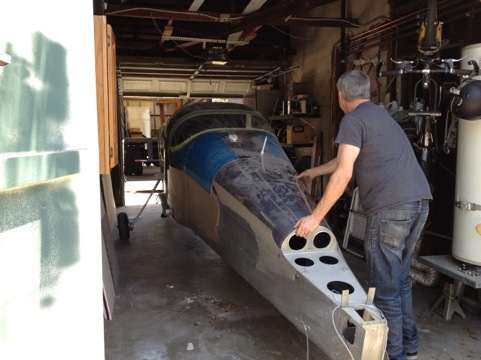
This RV7 stands 7’2″ wide from axle nut to axle nut.  The garage doors are nearly 8 feet wide, but the issue is the hot water heater stand.   It pokes out into the space about a foot.  What it does is reduce the available pathway from around 8 feet to 7’1″ and that’s a showstopper.   So being clever (never confuse clever with smart.), I jacked up the heater stand, took off the inside legs, and supported it with jack stands.  This allowed the right wheel enough room to get the camel through the eye of the needle.

20130504-105102.jpgThis might look unsafe, but it’s not; there are huge metal straps holding the tank against the wall.

20130504-105123.jpgRemoving the washer, dryer, and guest house range revealed the mess the guys left when they demoed the bedroom walls.   Nasty.

David arrived at 11am, and when I finished getting crap out of the way and zipping up the interior, we headed over to Marina Boat and RV storage to pick up the cube truck.   I had originally booked a 22′ truck with a lift gate.  This one is a 24 footer;  and we definitely needed the extra two feet.

20130504-120539.jpgThis is without a doubt the largest vehicle I have ever driven.   I need to look up the stats, I don’t know if they were supposed to rent me this without a CDL.   But oh yes, it has a lift gate.

Paulus and Ellen arrived around 1:30 and with both Paulus and Dave helping, we got the tool chest, the workbench and the plane onto the truck in less than an hour, mostly thanks to that lift gate.  The lift gate is both brilliant and dangerous: It has the potential to mangle appendages, crush bones, pinch skin, and ruin your stuff.   David said that on a film set, something like 30% of all injuries are caused by folding lift gates like the one on this truck.  Whatever, it’s totally worth the risk.   That thing is genius.     The tool chest and workbench were just a warmup for the main event: the fuselage.   That was interesting.   We had to make lots of weird little turns to get the thing out of the shop and into position where it could roll toward the little garage.   At least I didn’t have to knock the wall down to get the thing out.  Some builders have.

GPS_Test
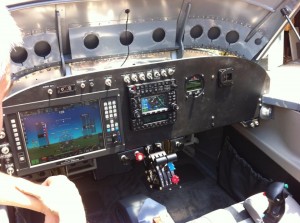
Once the ship was under open sky,  I fired up the avionics.    This has plagued me for months:   Did I wire the ARINC429 communication between the EFIS and the GNS430 correctly?   Did I install the GPS antenna properly?   For the first time since I’ve owned it, the GNS430 locked on to a satellite constellation and began speaking to the EFIS, so yeah, I’m awesome.

20130504-193443.jpg
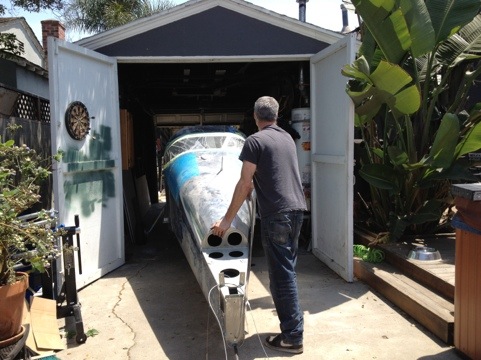
With tests complete, we started rolling the plane toward the lift gate.   Shelley took some shots, which is nice, because I wasn’t about to stop and do it.   At this point, we’ve just made it past the hot water heater.

20130504-193507.jpgLining up on the exit…

20130504-193518.jpgMoving forward, at a pace reminiscent of the giant crawler NASA used to move the Shuttle to the launch pad.

20130504-193533.jpgThe lift gate made this dead easy.   All we had to do was get the main gear as far forward as we could, then I lifted the tail while David raised the gate.  After that, it just rolled right in.   This is why you use the Penske trucks instead of the U-Haul: there are no wheel wells or fuel tube humps to deal with.   The truckbed is flat and made of wood, so you can do things like screw 2×4’s into it with deck screws.

The rest of it was what Dave called “Tetris: Homebuilt Aircraft Level.”   The rest of it was us loading, strapping, and securing.   Oh, and we forgot the prop, so we had to shuffle some things once we remembered the giant wooden prop box skulking in the corner of the shop.

We knocked off around 5 and buttoned up the truck.   I had dinner, walked the giant furface you see in the first pic, then put everything back that I’d extracted from the garage earlier to make way for the airplane.   Now I’m beat, my feet hurt, and I’m going to go sit in the hot tub.   Tomorrow, we hit the road at 8:00AM.

Strapped.

1.5 hours.

I got my crotch strap kit from Van’s today. This allows you to put the 5th poin of a 5 point harness in below the seat pan. Kits shipped after 08 had them included but I only figured out I needed it last weekend.

20130502-220338.jpg

These go between the seat ribs exactly where I stuffed a big wiring bundle, so some trimming was necessary. The left side is drilled and deburred, and I’ll rivet it in tomorrow.