7 hours.
Yesterday, I recovered from my cold enough in the afternoon to get going on the engine. This means I rolled the engine out on its stand into the middle of the room where I could work on it and prepared to take off a cylinder so I could have a look at the cam lobes. This would be the step that determines the way forward, because if the valve train parts are trashed, I have to send the engine in to a rebuilder and I’m looking at the possibility of a very expensive repair, because there’s no way to fix the camshaft or the lifters without splitting the case, and that STARTS at around 2 grand. So off we go. First thing was to de-pickle the engine. This meant draining out all the oil I’d had filling up the case since I bought the engine in 2008. There was oil hiding everywhere in this thing. Even after draining out the oil, every time I moved the crank or tilted it, more would come out from somewhere. But that’s kind of the point. Parts submerged in oil don’t corrode. The crankshaft bore gave me a bit of a scare. When I pulled the end cap off and fished out the old sock that had been shoved in there to keep the oil in (WTF?) I discovered a load of gray sludge in the crankshaft bore. This is lead and oil, congealed into a gray goo, like bad nanotech. At first I freaked, I thought this stuff was from the sock partially dissolving in there. The sock wasn’t dissolving, but the lead sludge was now all oiled up and nasty. I scraped that all out with a wooden tongue depressor and moved on. After I got most of the oil out, it was time to have a look inside. I went for the #3 cylinder, because it was the most accessible. The #1 was obstructed by the governor and bracket. Taking a cylinder off one of these things is not really that big a deal. Follow the manual, don’t lose any parts, and dont’ force anything, you’ll be OK. So that’s what I did.
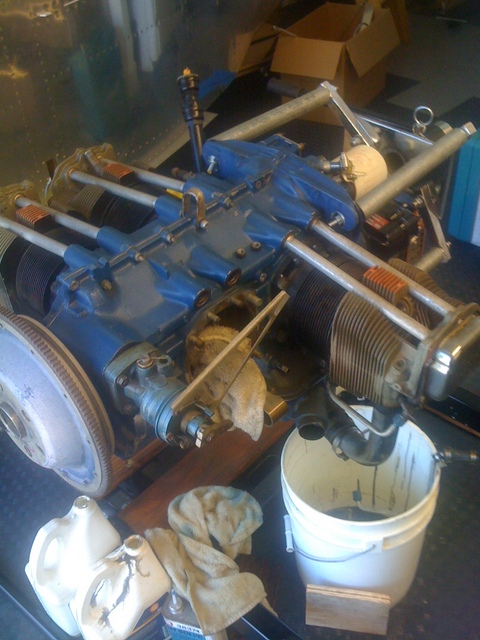
Lots of rags to pick up oil drips, and another one wrapped around the connecting rod so it doesn’t bash on the case and damage it. This would be bad. To get this far, I had to take the rocker cover off, remove the shroud tube retaining clips, then remove the rocker arms. After that, I could pull out the pushrods, and pull the shroud tubes through the cylinder head. At that point, the cylinder was free to go, after removing the oil drain line. With each one of these steps, more preserving oil dribbled out, hence the progression of rags on the floor. The drip pan doesnt fit under the engine stand, nor is it wide enough to catch oil from opposing cylinders. So what was the point of this? Oh yeah.. have a look at the camshaft and tappet bodies. Maybe that’s Greek to you, but essentially what happens is this: The crankshaft, which the prop is attached to, spins round and round. There’s a gear on it that drives the camshaft, which also spins round and round at a higher speed. The camshaft has a bunch of teardrop-shaped lobes along its length, so when it spins, the point of the teardrop pushes against the tappet body. The tappet body pushes on the pushrod, which pushes one side of the rocker arm. The other side pushes down on a valve, which, depending on its function, lets air into, or allows exhaust out of, the cylinder. The camshaft and the tappet body are a metal-to-metal contact point, which means that for them to work for any length of time, their contacting surfaces have to be as frictionless as possible. This is done by having those surfaces polished to a mirror finish and constantly bathed in oil. However, if there is corrosion on either surface, they’ll grind each other down to nubs, oil or no oil, but before that, the engine will start losing horsepower, compression on the affected cylinder will go down, and metal flakes will start showing up in the oil filter. Keep flying it that way and you’re asking for trouble. Metal bits migrate into bearings, block up oil passages, all kinds of nasty stuff, not to mention that if your valve train fails, you could be looking at an engine-out scenario.
So I was pretty keen to find out how that was. First pass with a bright light and an inspection mirror showed no corrosion, which was what I was worried about primarily. This is a Good Thing. I also ran a fingernail along the camshaft lobe and found nothing. If it fails the fingernail test, game over. Time for a teardown and a regrind on the camshaft, possibly a replacement. I was able to get the mirror behind the tappet body on the cam lobe I’d just checked and that looked good. No spalling, which is mech-speak for tiny dings and chunks of metal beaten away.
At that point I was totally chuffed. I was stoked to only have to replace the cylinders, which I wanted to do anyway, after seeing the compression numbers in the logbook. Something tells me the aircraft this engine came from was flown infrequently at best. So with that in mind, I moved on. This engine was to be converted into a fuel-injected one, changing from an O-360 to an IO-360. I have the Superior forward-facing cold-air sump, and the Airflow Performance fuel injection system ready to rock, along with the high-pressure fuel pump necessary to feed it. So I figured I’d do that next.

This shows the fuel pump pad almost cleaned off and ready to have the new pump put on. The old gasket material pretty much baked itself on, so even this little bit of work took a lot of elbow grease with a plastic scraper and a scotchbrite pad. That little round button sticking up back there inside the case between the two bolt holes is the actuator shaft. This is driven by a cam on one of the accessory gears, and with the engine installed, makes installing the fuel pump a royal pain. Upside down on a stand, though, it’s a breeze. I put the fuel pump on temporarily with a new gasket (since I don’t have the proper gasket sealer) and went on to the next step.

The next thing was to take off the original backwards-facing sump and replace it with the Superior one. No big deal right? Wrong. Old gaskets suck. They suck so much, I don’t know where to start. Once I was finally able to get the old sump off, after some persuasion, I was faced with the task of removing the old gasket. This is a slow crawl, square millimeter by square millimeter, carving off old gasket material. Can’t use a razor blade. Razor blades are steel. The case is aluminum. A razor blade will shave off case right along with gasket. plastic scraper is best, after loosening up the old gasket with gasket remover. Keep that stuff off the paint, out of the crankcase, and out of your eyes, and plan on being there a while. I’m still not even half done.

The other good news is that I didn’t find any corrosion in the gear train either. Maybe I don’t know what to look for, but I know what rust looks like and I didn’t find any.
I took a break from gasket scraping for a while. During this break, I don’t know why, I went to have another look at the cam lobes, just to make sure I wasn’t dreaming. I’m both glad I did and really bummed out at the same time. The engine was rotated to a different position by this point, one which got the exhaust lobe on #3 into a different position. Also with the engine back upside down, it was easier to get light and mirrors in there to have a look. So I did. Sure enough, the lobes were good, as far as I could tell. The tappet body I checked earlier was fine. But the next one over, the exhaust tappet on #3 was not. I could get my finger between the lobe and the tappet surface, and I could feel something. I got the mirror in there, and bang, there it was. The tappet was a near perfect match for the picture in the lycoming overhaul manual captioned “starting to spall.” About a 1/8″ square area was pitted and rough, and It wasn’t the Rockwell marks either. So there it is. Pretty much a day out the window, and potentially quite a few thousand dollars. Any spalling of the tappet bodies means they need to be replaced, and the camshaft now needs to be inspected with at least 10x magnification. So now I know what to do next: Find an engine shop and get it torn down.
In retrospect, perhaps it would have been better to just buy a crate engine from Mattituck or Aerosport, or even Van’s, or maybe buy a zero-time rebuild from one of the various engine suppliers out there, but this combination was going to be mine. 6th order counterweight, no rpm restrictions, front-mounted governor, forward-induction. It may very well cost me the equivalent to zero-time this engine and configure it for what I have in mind, but at this point, I’ve almost got too much invested to just chuck it all and start over. Or, maybe somebody can build me a long block and I’ll finish the rest. But hey, at least I got to use my Lycoming cylinder wrenches once. In any event, Tim’s Aircraft Engines gets a call from me on Tuesday.