A couple of laps around SMO

A while back, my MGL V6 radio crapped the bed and put me back in my pre-redundant-radio situation.   Not a big deal, and especially now, because I really, really wanted to see Santa Monica at sunset in a plane I built myself.   I needed to get some fuel anyway, so I headed up to the airport and got going.

IMG_2343


IMG_2344

That nest of snakes down there is the I-10/I-405 interchange.   The sun is setting on the Santa Monica bay.

IMG_2338

Heading east, towards Hollywood.   The sun hitting the buildings at this time of day is almost as cool as the sun hitting the water.


IMG_2342

An attempt to compose the photo to look like the City of Santa Monica signage.  This is a bit of an FU to the airport-closing shenanigans the city pulls every chance they get.

New cowl plugs!

20141127-210448.jpg

Moving to SMO, Flying to Palm Springs, and a Trip around the Bay.`

I know, I should post more, and add more pictures.  I’ll do that, it’s just that when I’m flying, I’m really not thinking about photography.   I should probably be using this blog instead of Facebrag to post updates about N313TD’s flying career as well, so I’ll try to do more of that.

About 3 weeks ago, I finally quit the hangar at OXR and moved the plane to Santa Monica Airport.   On Saturday I rode the Amtrak train to Oxnard, got a ride from the train station to the airport and flew the plane back.   Planes, trains, and automobiles.   The only mode of transportation I didn’t use that day was a boat.

I got a tie-down in Lower Southeast parking, and you can see it if you’re driving south on Bundy just before Airport Way.  It’s next to the fence by the dog park, nestled between a hulking, ancient Navion and some kind of large Cessna.   I think it’s a 182.    I’m not happy about having to keep it outside, but that’s just the way it is, and the Bruce’s cover I got covers up all the plexi and the seam between the canopy and forward skin.   It’s already rained since, and my stuff stayed dry, so I’m happy about that.

The following day was Shelley’s first flight.   We should not have gone; it was windy, bumpy, and crowded.   Most crowded I’ve ever seen it at SMO, with a sky full of English-as-a-second-language pilots who couldn’t seem to shut the fuck up.   At one point I was “number 5 following the Cirrus” and my downwind leg went nearly to Dodger Stadium.   There was a nasty turbulent layer about 100 feet off the runway and apparently, I’ve been fighter-jocking this plane since day 1, because Shelley was not comforted by the technique displayed during most phases of flight.     We had to go around twice: first time, I didn’t like the landing and the drift.   Second time we were too high.  Third time was the charm, but I have to say that was the worst flight I’d had in the plane so far.

Since then, I’ve been learning to program routes into the EFIS, learning the 430, and stopping by the plane whenever I can.  It’s not as nice as having a hangar, but it’s infinitely better not to spend an hour on the road before I can fly or tinker.  It’s not so bad.   The Bruce’s cover works great and I’m able to tie the plane down securely enough, and I made some nice chocks out of aluminum scrap and 14-ga. wire.

This past weekend, we went to see one of my best friends from back in the day get married in Palm Springs.   This would be Shelley’s and my first destination flight with the new plane, and first flight post-scary/unpleasant day.   I’d been watching the weather nearly obsessively, using SkyVector to make my flight plan, checking forecasts, and especially checking trends in Banning Pass, which can get really nasty when the wind’s coming from the north.   I was also a little intimidated by KPSP, being an international airport that services regular jet traffic.

I took the afternoon off work and we got prepped and ready to go by about 2:30pm.  Picked up a little fuel at SMO, then headed out.   Weather and traffic at SMO was way better this time around, plus we got a flight following squawk code on the runway.   Flight Following is awesome.   We had handoffs and coverage all the way into Palm Springs.   Our route was Santa Monica, El Monte, Brackett, Riverside, Banning, Palm Springs.   There were a few bumps in Banning Pass, but nothing terrible and once we got to Palm Springs we were literally the only aircraft in the sky.   We were cleared to land on rwy13R which we did easily because there was a 4kt wind right down the runway.   Oh, and the Signature FBO treatment is very nice.

Coming back we got flight following again, and the marine layer cleared up in time for us to land at SMO, I thought we might have to divert to Van Nuys, but we were all good.   Did a modified straight in, landed, all good.

Rockin the clock.

5 hours.

Last time I went flying, there was a very odd glitch.  On the first takeoff of the day, if I do a quick pattern, on base leg before final, I’ll lose my AHRS and compass.   This was intermittent, and I couldn’t reproduce it on the ground.   This week it got worse: If I landed and taxied back to the hangar and shut down the engine, the instruments would come back.  With the engine running, the AHRS and compass are inop.  This is WEIRD.   Strange things happen when voltage dips below 10v, but my backup battery and system voltage both were above 12v.   A quick check of the RCA cables revealed one loose.

Bingo.  RCA cables as aircraft duty connectors are a the worst idea in a collection of bad ideas, but there’s not a lot I can do about it.    Added item to maintenance checklist.   No weirdness from the radio either.

But the futzing around cost me an hour of valuable good weather.  I had planned to get 4 hours of flight time today; I got 2.   That’s only 14 hours left on the Phase 1 countdown clock.   But I need all this crap to stop happening so I can do some real tests.

Onward.

10 Hour Oil Change

8 hours.

OK, it’s the 13.2 hour oil change, but who’s counting?   I got out there as early as I could and set the engine to draining.  The cheesy quick-drain valve on the sump has an absolutely abysmal flow rate, but it has a fitting for a length of hose so you can drain it into a container and not get dirty oil all over the place.   I set it going and worked on other things.   After it had put some oil in the bucket, I took the oil filter off.   This is tricky, because the spin-on oil filter is basically a can full of dirty oil that just wants to dribble it everywhere it can.   The neat trick I figured out is to wrap a rag around the bottom of it while taking it off.

The next thing to do was cut the filter apart and have a look at the filter element.  The guys left an oil filter cutter on the workbench for me, but it was the wrong type, and didn’t work with my filter.   My filter has the threaded fitting on it, and this cutter is designed for a filter with the threaded hole.    No big thing.   I just put it in the vise and cut it apart with a rotary grinder.

I found no metal bits on the filter element.   None.   That was very cool.   That means my engine isn’t shredding some vital part of itself as it runs.  I also took out the screen and had a look at that. One solitary aluminum chip (which I suspect actually came from the bench I set it down on), and a couple of dark, non-metallic flakes and that was it.    I spun on the new filter and safety-wired it up, then replaced the oil screen and wired it.

A fairly detailed inspection showed no chafing or burning, but there was a weird discoloration on the firesleeve of one of my fuel lines.   I need to check that out, but I think it’s just from some oil that got on there before.

And finally, today, I dialed in the governor.  I had been getting a max takeoff RPM of about 2459, which was enough to get it in the sky, but the takeoff power on that engine is supposed to be 2700.   A turn and a half of the fine pitch screw on the gov, and my takeoff RPM is now 2650.   I’ll call that a win.    The weather turned out to be decent – clear skies with wind 11 at 260, so I got a chance to fly a bit.   Maintenance clock was reset to 25 hours, and I’m back to testing.

No More Wobble.

16 hours.

Going to have to sum up last week as well.   Last weekend I did the fiberglass layups on the intersection fairings.   I hate those things.  As is typical with Van’s fiberglass, the fit is garbage.   Add my lack of skill to that, and the result is a set of ugly  fairings that just barely managed to get the job done.   I may wind up reworking the whole landing gear fairing mess, but for now, these will do.   I think if I actually make them smooth and trim off the excess, I’ll get a couple of knots out of them, but the process went like this:  Saturday – Fiddle with wet fiberglasss layups all day.   Sunday – trim the extra bits off, install some platenuts for mounting hardware, go flying.

That’s when I noticed the wing wobble.  running flat-out, with ground speed at around 190mph, trimmed up, the slightest bounce on the stick would cause a divergent oscillation..  This is without the autopilot, au naturel.   Bump the stick, the wiggle starts and just gets worse.    So I had to leave it for another week.

This week:

2 hours fiddling, almost 3 hours flying.  I can live with that.   First thing on the agenda was to double check the gear leg fairing alignment.   No issue there.   Next was clocking the governor back a couple of notches on the control shaft to get more RPM on my takeoff run.  It currently tops out at 2549, when it should be around 2600-2650.   One notch is too coarse of an adjustment; I wasn’t able to cycle the prop during runup, so I had to set it back to where it was.    With that fixed,  I went up just to confirm the oscillation, and sure enough, predictable and repeatable.   So I came back down and checked my rigging.  Turns out, one of the ailerons was off.   Not sure how that happened, but whatever it was, it wasn’t enough to cause a problem with the gear fairings and wheel pants off, at least not until the autopilot was engaged.   The AP couldn’t keep up with the oscillation either.    And, because I’d read about it, I checked the trailing edge of the ailerons.  The control surface is supposed to be absolutely flat from front to back, and then it wraps around where the trailing edge is bent.   This being a quickbuild kit, you’d think they’d be just fine.   Not so.  If the surfaces bulge outward at all, they can cause instability, so you do the heavy-wing treatment: Squeeze the trailing edges so the top and bottom are flat and not curved outward.   Even a little convex is OK.   But the idea is to go easy, not even enough to notice visually.

That was the magic bullet.    Hands-off, the stick stayed rock solid.   Repeating the bump test had the wings settle back to trimmed bank angle.   The autopilot was still a little twitchy though.   The fix for that was to move the AP control linkage to the innermost hole on the servo arm.  Less motion, more precise control increments in the stepper motor.   So that was awesome.   Being able to steer the plane with the heading bug is cool.

With everything trimmed up, balls to the wall, I managed to get 192mph ground speed in level flight.   The fuel burn was absolutely decadent, but it was pretty cool to go almost 200mph.   Oh, and the oil door stayed closed, which was nice.

So I did some more speed runs and spent some time getting familiar with the new handling.   A little different with gear fairings.   It doesn’t slow down as fast, for one thing.   I landed at SZP, went back to OXR, then spent some time in the pattern.   Landings are a little different as well.

Pants.

7 hours.

Put the pants on, one leg at a time.   I’m about to head back into my regular work schedule, which means days will become weeks.   So a task that will take a couple of days, will become a couple of weeks, because I’ll only get to it on weekends.  And the fun part coming up:  Wet fiberglass!  But this is what I got done today:

People’s exhibit A:  The right side wheel pant with the intersection fairings test-fit.


IMG_1965

Left wheel pant.IMG_1966


IMG_1967

Getting there.   Today was all about installing the mounting hardware for the fairings  Since we did the tweaky measuring stuff on Friday, today was all about just putting everything together.   Lots of platenuts to replace the clecoes from the position-locking drill ops.   But it is actually pretty cool how sturdy these things become once they’re put together and installed.   They’d better be.   They’re going to get the crap beat out of them.

Next is the wet work.   The intersection fairings will have to be taped on, then have a couple of layups of glass put on them to thicken them and make them conform to the exact shape of the fuse, gear leg fairings, and wheel pants.  I’m still working out the best way to do this, but I think it’s a two-day job.   One side per day.    Then the whole kerbang comes apart and I take the parts home and paint them.

Back to Project Status

IMG_19596 hours.

About 10 hours into Phase 1 testing, and so, time for the first oil change, among other things. Have I mentioned I love flying this airplane?   I’ve been flying all week and not blogging much, because I’ve been learning the airplane, how it flies, how it feels.  I can report with great accuracy that gyroscopic precession is a bitch:   If you try to lift the tail too fast, the aircraft will quickly be pointing at whatever is to the left of you.

I’m updating and rearranging the order of things in my checklists, based on where the task is spatially in the cockpit.   This is just good UX design, but like anything else, you work out the best workflows through usage.   For instance:  Put the flaps up before takeoff.   Yes, I know, this should be a post-landing task, and it usually is, but it doesn’t hurt to have it on the runup checklist before RPM to 1700.

The autopilot is more or less dialed in, but it still jitters a little bit.  This is unsettling and needs fixing, but that can happen later.  At least now it doesn’t pull a divergent oscillation in bank.   My fuel flow fix works as well.  I’m now reporting a burn rate consistent with what I expect for a given RPM or MAP.

Day before yesterday, I took a flight to Santa Paula to get fuel and spent a little time buzzing around the Ojai valley.  That’s where the above pic is from.   But following that flight, I decided to take a run at tweaking the idle, which is still al little rough down in the 750’s.  Last time I messed with it, I set it richer to cure the somewhat terrifying issue of it stumbling when advancing from idle to high RPM.   I think I went too far in that direction because since then, it’s run rough at idle and has been a bastard to start when hot.    The hot start is a known issue with FI engines, but even with the proper procedure, it’s difficult, so an adjustment had to be made.   This took the better part of an hour and a half, and the engine has to be hot when the adjustments are made.   This is why I have a nice burn on my hand from trying to get a wrench into the space where the idle adjustment arm is.   I’m still not ballsy enough to adjust this thing with the engine running.  That’s just not going to happen, especially when the exhaust pipes are still hot.   It’s amazing how fast ss exhaust pipes cool, but you don’t want to have a forearm laying on one when they’ve got hot gas blowing through them.

I was going to go fly again, but the wind put the kibosh on that idea:  14kts gusting to 20kts, although right down the runway.  I was too chicken to try to fly that, although I could have probably done wheel landings and i’d have been OK.  Better safe than filling out FAA forms over the wreckage of a balled-up airplane and a bunch of broken runway signage.

But yesterday saw the return of 313TD from aircraft to project.   David and I did the cutting and measuring of the wheel pants and gear fairings.  This is way more difficult than it has to be: You have to take the weight off the gear so you can align the wheel pants and gear fairings in trail.   Fortunately, the local airport mafia purchased a surplus forklift for a couple hundred bucks, and doubly fortunate, Dave knows how to drive one!

IMG_1960

I didn’t snap a lot of pics during the actual process because we got busy and stayed busy.   We first jacked up the plane on each side to install the wheel pant brackets, and took the opportunity to bevel the brake pads in an attempt to stop them from groaning during taxi.    Then we used the forklift to lift the airplane by the motor mount just high enough to get the weight off the wheels and the bend out of the gear legs.   Then there was a lot of crawling, measuring, and marking to find the centerline of the wheel parallel to the centerline of the aircraft.   We drilled the aft section to the gear brackets once we had everything lined up.

IMG_1962

It’s amazing how hard it is to find a 1″ block of wood in an airplane hangar, but 3/4″ PVC, no problem.  Short sections of that were used as spacers on the vertical to give the 1″ clearance required for the wheel pant.

Then we did the loop-of-string method to insure the gear leg fairings were in trail.   No drilling done there, but marking the position on the gear legs got us what we needed.

This whole process required making as much space in the hangar as possible, so we had to shove the Luscombe outside and move a bunch of stuff around to accommodate the forklift’s dance moves.

IMG_1961

The yellow chocks are where the forklift wound up to put the tine with a hole in it directly above the engine mount.

Of course, all this means that the aircraft is down until the fairings can be installed.    This is necessary anyway because I need to do an oil and filter change and a thorough under-cowl inspection.   Fortunately I can do some of the fairing work at home, like paint.   But what’s left is the onerous, fiddly part: glassing in the intersection fairings, then trimming and priming the pieces.   When that’s done, I should be able to bolt it back together and go flying some more.

Wow, this thing is fun!

8 hours.
1.8 flight hours.

I got off to a late start, and didn’t get to the airport until about 10:30. I got the cowling back on and programmed in the autopilot numbers Matt sent me from MGL. I got off the ground and saw my #4 cylinder was reading totally cold, which was not right, because the plane was making full power just like it’s supposed to. I turned around to land, and managed to sneak in ahead of Derek Spears, who brought the family up for lunch.

After that, I burned some more gas, climbing, turning, generally getting the feel for the airplane, and doing it with the throttle rammed to the boards for cylinder break in. The numbers for the autopilot worked pretty well, and I could steer the plane by changing the heading bug on the EFIS. I have no words for how cool that is. It was still a little springy though. The correction the AP did had a little bit of oscillation left in it, so I’ll fine tune it and see what I can get from it. Most people have trouble with the pitch servo, but mine dialed in just fine. I got a couple of landings in on that flight.

I put about 1.8 hours on the plane today, and it would have been over 2, but on my last flight of the day, the oil fill door popped open in flight. Surprising, but not problematic. I headed for the deck and got into the pattern, then set down and burbled back to the barn.

One thing I’ve been noticing is that my fuel flow is ridiculously high, according to the little gizmo on the EFIS. According to that thing, I’m burning 45gph on takeoff and 30 in cruise. Last time I looked, this wasn’t a 414 or a twin Bonanza, so like, WTF?

Fuel flow works by doing some clever math using the k-factor of the flow sensor. When I got my sensor, there was a tag that said 16-3496. I assumed 3496 was the k-factor and dutifully entered it into the EFIS when I set it up. But MGL EFISes are metric, internally. That means the k-factor on the American FloScan sensor has to be converted. 3496 x 10 / 3.785 = 9236.46, which will probably give me the fuel flow numbers I expect.

First Flight!

4 hours.

Yesterday, 313TD got some air under the tires.   Weather was perfect: Wind 260 at 4, clear sky, visibility unlimited.   This was actually a couple of firsts for me.  It was my first taildragger solo, my first flight in my airplane, and my airplane’s first flight, period.

Shelley, Dave and I arrived at the airport at about 9:45AM, and we spent  a bit of time waiting for the wind to flip over from 090 to 260, the direction of the runway I’m authorized to use in Phase 1.   We busied ourselves prepping the airplane.   We cleaned off the plexiglass, removed the stray items from the cockpit, and generally got things ready to go.   Ron was there briefly to go up to the Chicken Strip with Owen for lunch, and he loaned me his handheld radio, which Dave and Shelley used to monitor the tower.

I went through my engine start checklist, but somehow missed turning off the 430W prior to start, which was bad, because the power drain forced it to go offline, and when it came back up, it had to verify its database.    That takes a while, and I was freaking out a little bit, thinking I’d just burned my radio and would have to abort the flight.

Eventually, it did come up and I was ready to go.   I did a radio check with ground control, then taxied out to the runup area at runway 25.   I did my runup checks, then called the tower.   “Experimental 313TD at RWY 25, first flight in phase one testing, intend to turn right, then climb to 4000′ and remain above the airport.”

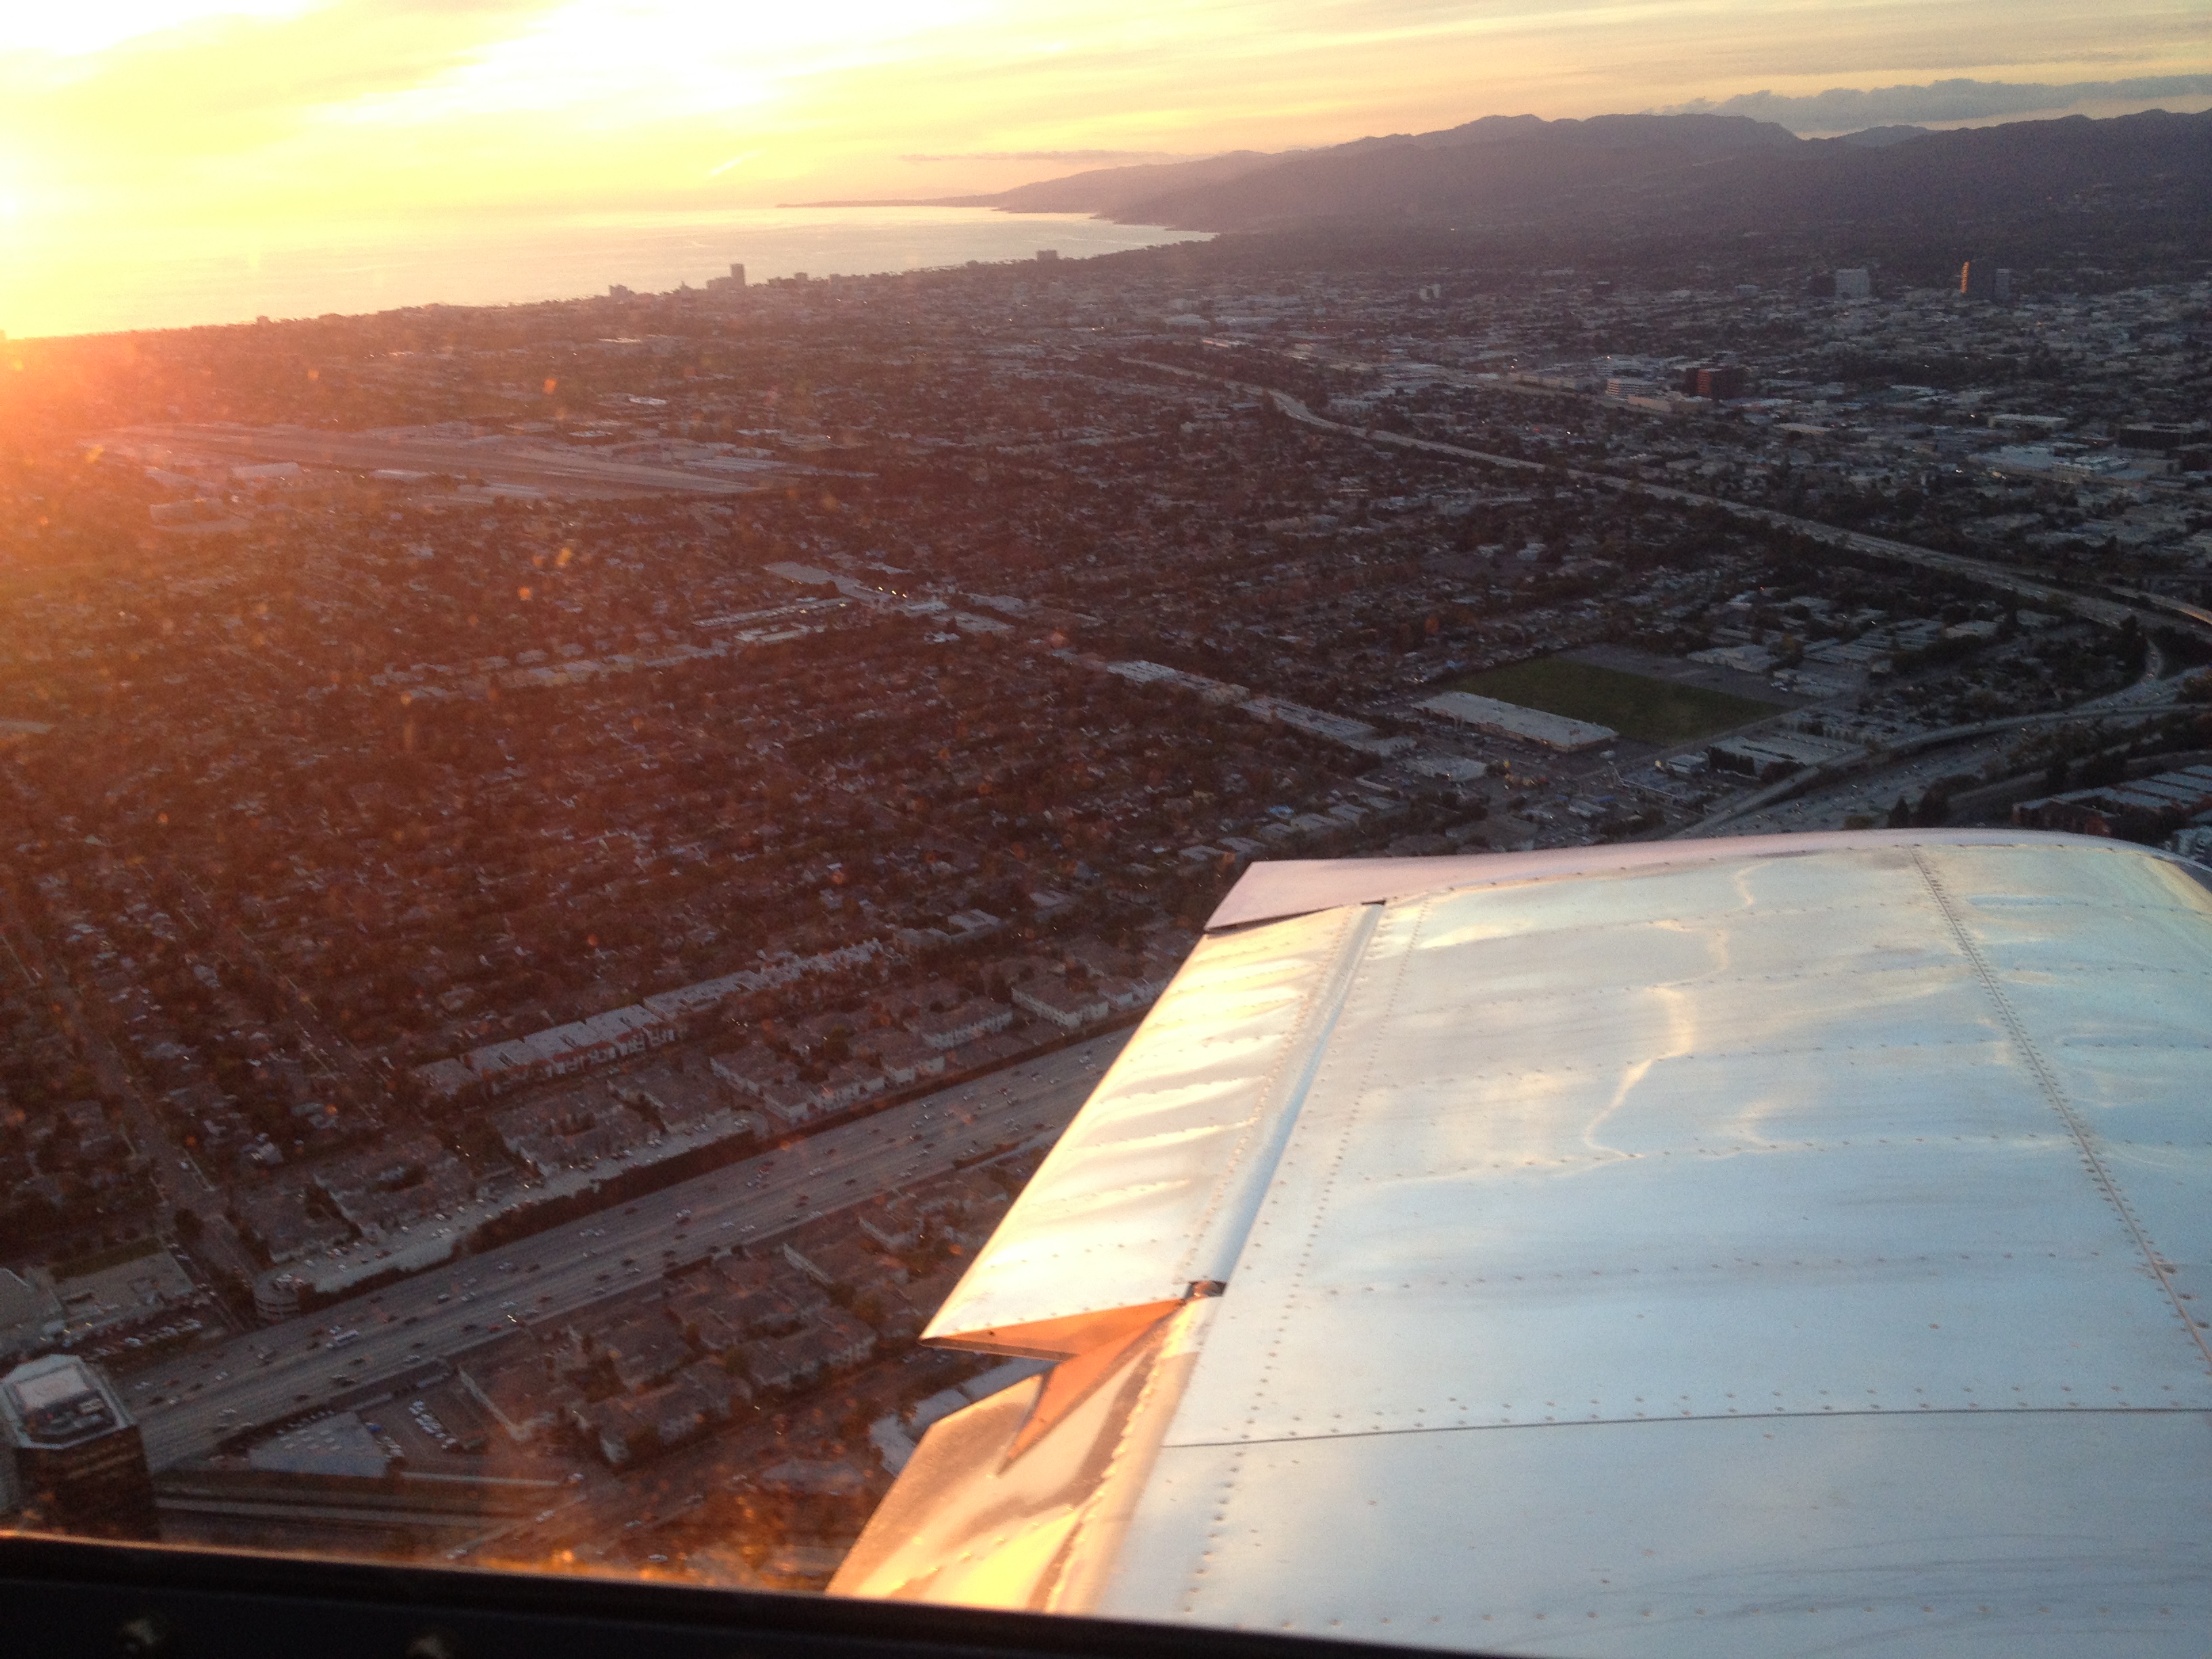
They cleared me for takeoff right behind Owen’s Bearhawk, which was kind of cool.   I couldn’t really tell if I had a heavy wing or not.  I didn’t have to fight it to keep it wings level on takeoff, if that means anything. The rolling around you see in the video is me not holding the stick all that steady.  I couldn’t tell you what my angle of climb was, but lowered the nose a bit to see if I could get my CHT’s down a bit.

By the way, without a couple hundred pounds of flight instructor in the right seat and only half fuel, this thing jumps into the air like it was beamed up from the Enterprise!

On climbout, #2 and #4 hit the caution mark at 400, but the nose-down brought them back into line.   I climbed to 4000′ doing slow circles upward.   Once I had 1500′ made, I pulled the throttle back to 2500rpm and MAP to 25.  I fumbled it a little bit, but I still don’t know the controls that well.   I also fumbled setting my transponder to altitude.   Never mind that there’s a giant button on it to engage altitude reporting.  OXR didn’t see it, and Pt. Mugu approach didn’t see it, but  I eventually figured out I needed to push the damn button marked “ALT” instead of “ON.”  But hey, the transponder works, so that’s nice.

Once I was at 4000′ and my instrument shenanigans were done, I could concentrate on feeling out the airplane.   Among the first things I discovered was that my airspeed tape was inoperative.   I guess of all the things that could be inoperative up there, that’s the easiest one to deal with.   I blipped the trim control a little bit and that seemed to level out the wings, but since I have no trim position indicators, I’m not sure it was ever centered to begin with.   Like I said, I didn’t feel like I had a heavy wing, and it didn’t take much trim to correct it out.   Once I stabilized, I trimmed up altitude and it flew hands off, which was awesome.   I guess I built a more or less straight airplane.  More accurately, the Filipino factory workers who did the QB kit built a more or less straight airplane, but I think my sweep/twist/incidence measurements and final drilling were pretty much on.

Without airspeed, I really had no idea when I could deploy flaps, so I did my best guess at slowing down to Vfe for slow flight.   I remembered the sounds (engine, wind) from training with Mike Seager, so I figured if I matched that, I’d be OK.   I got to slow flight with flaps extended and felt it out a little bit with shallow turns.  I wasn’t ready to stall it just yet, but I figured out about where it will stall.   It also feels different from Mike’s plane in that it’s a bit draggier with the gear fairings off.    I did this for a bit, making turns, going back up to cruise, all the while making sure I didn’t fly over populated areas per my op lims.

Naturally, I forgot to set a flight timer, but after the slow flight practice I decided to come home.   I called Mugu, who had been providing me with flight following (nice of them) and told them I was heading for OXR airspace.   Frequency change approved, I got OXR ATIS ,then called the tower.   Once again, I said hey, phase one first flight here.   They cleared me to land before I even entered the pattern proper.   I got slow enough to be able to think (probably 110mph or so), and got my downwind checks done.   I followed the sequence and checklists perfectly.   Abeam the instrument landing marks, slow down to 80 (ish) and drop half flaps.   Boost on, prop high, mix rich.   On base, drop the rest of the flaps and get the approach dialed in.   I came in a little fast, probably, and I definitely held on to power a little longer than I should have, but I made a good, straight, soft landing.   I ate up 2000′ of runway, but that’s my prerogative.   Then I taxied back, and we decowled and inspected.

Squawks:

Some oil seeping from the right mag gasket.

Airspeed inop

The airspeed we were able to fix easily: the AOA and pitot lines were reversed, which is why I got an intermittent airspeed reading which coincided with my taxi speed.   The oil, we wiped off and decided to see if it was indeed leaking from the mag gasket or somewhere else.   The amount was negligible.

I was going to go for a second flight, but during runup, the right mag was inop.  Boo.  Abort.   That’s what I fix today.   Here’s the video