Every so often I start getting that spread-too-thin feeling on this project. Too many things unfinished because they’re dependent on other things, and sometimes, the genuine chicken-and-egg scenario. I’ve also got a whole lot of ‘blow that off until you get to the airport’ type jobs to do that usually come about due to lack of space or lack of helping hands. After yesterday’s autopilot fun, I decided to make a list. I’m going to do it here, so bear with me if it goes fractal and sounds like Ginsberg from time to time.
What i’ll do is list what I have to do, then list the excuses for why I haven’t done them. Sound good?
We’ll go by subkit and make it easy:
Empennage:
fiberglass tips – Can’t do that until the final elevator balancing is done, which needs to be done with everything rigged.
strobe/position light wiring – No excuse for this at all, just haven’t done it. Need to do the fiberglass work as well.
trim servo cotter pin (yeah, this is an easy one, I know) – I just have to do this one.
trim servo wiring run – I may have hosed myself on this one. I’m not sure exactly where/how to feed the servo wiring from the servo to the root of the emp so it can run forward to the cockpit.
body filler/damage control – The empennage is where all the early mistakes got made, so there’s some ugly stuff I need to plaster over with body filler. An extra hole from a badly placed dimple die while dimpling for the stiffeners, for instance
Wings:
wingtip wiring connectors, nav antenna wire – I’m storing the wingtips on the overhead ledge. I filed this task under ‘airport.’
Autopilot servo – My clever conduit interferes with the bracket. I now have to take a section of conduit out and route the wires around the bracket/servo assembly. See yesterday’s entry.
closing the wing skins – Airport or right before. I’m not closing those up unless I’m absolutely sure I won’t need to get in there again.
Fuselage:
Autopilot Pitch servo – Just haven’t done it yet. Need to fab bracket and make pushrod, but I can’t do this unless the elevators are rigged and neutral. I just took the emp off so I could move around the shop again.. I should have waited. Whaargarbl.
Rudder cables – need to paint the interior before I run those cables.
Brake pedal support – need to paint it and paint the interior. first.
Firewall recess – waiting to see if I do or don’t need to reach my arm through that hole to buck something (lame)
Fuel lines – Need to paint interior first.
Subpanel, panel and canopy supports – in process now.
Finish kit – Everything.
Well, that’s all I can think of for now. I’ll probably edit this as I think of new stuff.
The Dreaded To-Do List
Fun with the Autopilot.
1 hours.
Yesterday my package from Trio Avionics showed up. W00t! This morning I started installing the roll servo in the right wing. I found out two things. One, I need a proper crimping tool, because now I’ve gone and killed the ground wire lug that’s supposed to attach to the mounting bracket and two, The servo and the bracket don’t fit, thanks to the position of the wiring conduit. Observe:
You’re looking at the left wing, but the right wing is set up the same way.

This is an image of the servo mounted in the Trio Bracket. Image is from the Trio website.

The trim servo bracket protrudes up far enough to interfere with the wiring conduit. So now I have to remove a section of the conduit, secure the ends, then route the wiring around the servo while protecting it from friction. Of course, this will solve the problem of cutting a hole in the conduit for the servo control wiring. Another option is to send the bracket back to Trio and fabricate something that allows the servo to sit flat against the spar. But this method involves drilling the spar, and I’m going to avoid that if at all possible. The third option is to install the servo in the wingtip. I can use the bracket, and it’s OK to drill the spar out there on the end of the wing. Of course, that means I have to fabricate a long servo pushrod from wingtip to bellcrank as some have done for their RV-6 retrofits. Still another option is to put it under the seat floor, which has the advantage of accessible wiring, but I still have to make a pushrod from there to the bellcrank. Of all the options, removing a section of PVC conduit in the wing seems like the least painful, depending on how many contortions the wiring has to go through to get around the servo. Even so, there should only be a strobe cable and position lights going out to that wingtip; the Archer comm antenna is in the other one. The other question is, how far up into the conduit does that bracket protrude? And can I notch it without compromising the integrity of the bracket or the servo? This is a question for Trio, since I’m not about to go hacking on a $750 module without very specific approval from the manufacturer.
Originally, i had no plans for an autopilot. But things change. The Trio servos work with the MGL Odyssey, and since that’s going to be my EFIS, why not? The good news is, I haven’t closed up the wings yet. The bottom inboard skins are not yet riveted on, so I have lots of room to work.
Oh well, at least I can work on the pitch servo.
Finished Roll Bar and other stuff.
4 hours.
Finished the roll bar! Booya! I drilled the roll bar to the F-631D angle, after all that measuring from last time. A couple of goofs, but not too bad. First was that I trimmed the radius for the angle bracket a little high. I had to abandon the lower hole in the F774 skin ear where it attaches the skin to the angle bracket, because the 1/8 hole didn’t have the edge distance required. I had to do this on both sides, actually. Kinda bummed me out, but a little filler and you’ll never notice. The other thing I did was drill out the lower forward hole on the right to #19 instead of tapping it to 8-32. Duh. So I’m going to put an AN-509-10R10 bolt through there and lock it down with a stop nut. Everything else is fine. I got my edge distance for the 8-32 screws and the 10-32 screws on the aft section of the roll bar. I also didn’t have to remove much metal to follow the curve of the longeron where the skin lays against the angle bracket.
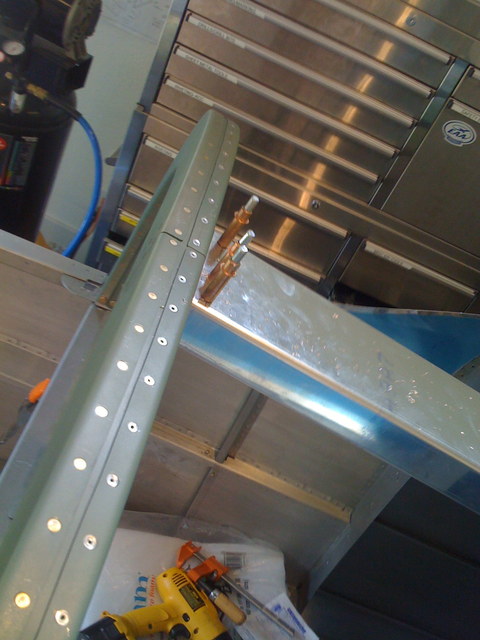
This is the left bracket bolted in.

And this is the right one. Not that you can tell with me shaking the camera like I’ve got a jackhammer in the other hand.

This is where things got a little odd. The cutout for the roll bar is a little high. Not terribly. And yes, these corners are radiused.

After getting everything drilled in and bolted up, it was time to finally install that support channel thing, and I can’t remember the number of it right now. This gets drilled to an angle on the back of the roll bar, and it connects to the next aft bulkhead. The back half of the canopy plexi goes over this. Others have put baggage compartment lights, in this part, but my interior lighting is going to consist of what’s necessary to see the controls and instruments, and not much else. I think a LED flashlight velcroed under the armrest would make a fine baggage compartment light. I don’t want to wire anything I don’t have to.
This shot just shows the AN3 bolts on the inboard left holding the roll bar to the angle brackets. Oh yeah, I had to trim away a smidge of the seat back stop for the angle bracket to sit flush.

After that, I went on a mad cleaning spree. I rounded up all the loose hardware that had fallen on the floor or in the belly of the plane and returned all the tools to their proper places. I vacuumed 2 weeks’ worth of metal chips off the floor and a load of aluminum dust off the grinder/saw bench. Then I vacuumed out the plane,
Clean shop:

Clean ship:

After that, I tied up some loose ends. The forward-most bulkhead in the tailcone comes from QB-land with pop-rivets installed in the joint between the two bulkhead halves. I guess this is for better skin fit or whatever. Plus, the plans tell you to leave the bottom hole open if you’re building a sliding canopy. Well, I’m not building a slider. So I was able to get those done.

The other thing I got done today was something I should have taken care of when I put the control column together, but for some reason, I blew it off. I drilled the hole in the control column for the right-side stick. There’s a bolt through there, but it’s not going anywhere without horking on it with something that’ll chip the powder coat, and besides, I don’t see the point of taking the right side stick out anyhow. Maybe if shelley decides she doesn’t want the thing in her lap while she knits on long XC flights, then I’ll revisit it, but for now it’s there.

The last loose end I took care of was the rest of my finish kit inventory. I still have to do all the little bags, but I got everything checked off the list. This is most of my finish kit, occupying the guest house bedroom.

Roll Bar/Cabin Frame
1.5 hours.
Not sure what to call that thing. Cabin frame, roll bar, dunno. That upside-down U-shaped thingy that keeps your head from snapping off in a rollover. I made the cuts for the radii of the F-631D angles and got everything lined up for drilling. This was one of those things I needed to get absolutely right, so I spent a good long time measuring, double checking, measuring, clamping, and finally marking where the angles will go. I sort of used Mike Bullock’s method, where I clamp the roll bar to a straightedge clamped to match the angle of the front of the skin ears. Mine was a little different, in that I kept the roll bar on the whole time instead of using pieces of equivalent thickness, then marked the outline of where the angles lay. This will get me where I need to be for drilling, although i might try the other way when I get home, since I haven’t committed to any holes yet.
Cabin frame. Again.
1.5 hours.
stuck the F-631D angle brackets together and started getting them lined up on the fuselage. Van’s says the roll bar is supposed to go 56 13/16 back from the ‘fuselage station’ which in this case, means the SS firewall. Well, that’s nice and everything, but my ship is a quickbuild, and where the holes on the F-774 skin line up to the roll bar and have good edge distance is about 57″ and small change. This gets the F-631D brackets into the big angles under the baggage deck bulkhead with enough clearance for the nuts that hold down the brackets, roll bar, etc. What was a very pleasant occurence is the way the roll bar itself all came out. For a quick and dirty test fit, I clamped the angle brackets down with the outer bracket at the edge of the longeron, right where it’s supposed to go. The roll bar goes on these without much trouble, but I can see having to stretch it just a hair to pull it into line. Next thing is going to be drilling the brackets to the bulkhead, then drilling the roll bar to the brackets, using the foremost aft top skin as a drill guide and lineup tool. Yarr.
Stay tuned for the attaching of the roll bar.
That’s how I roll bar.
4 hours.
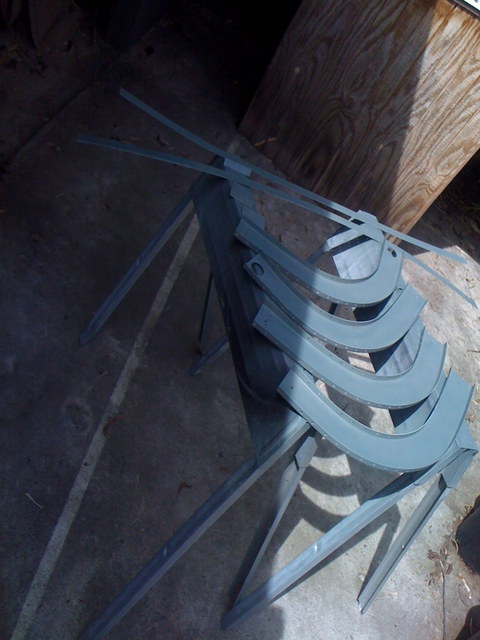
Combination entry for today and yesterday. Got the roll bar channels all riveted up. This involved some priming, again a lovely shade of Colonial Marine drab.
Here are the major parts, drying in the sun. For those of you in the cold crappy states like the one I’m from, it was 74 degrees F, sunny, and calm. Perfect paint weather. I’m not as anal about priming as I used to be, but since this stuff is pretty well inaccessible once it’s riveted together, a light coat of primer might help, especially since I live right near the coast, where the salty marine layer infiltrates everything.
With the channels clamped back to the board for flatness, I riveted the upper strap of the forward channels. They have you do the forward channels with AN-426 solid flush rivets, since you can get at them with a squeezer.
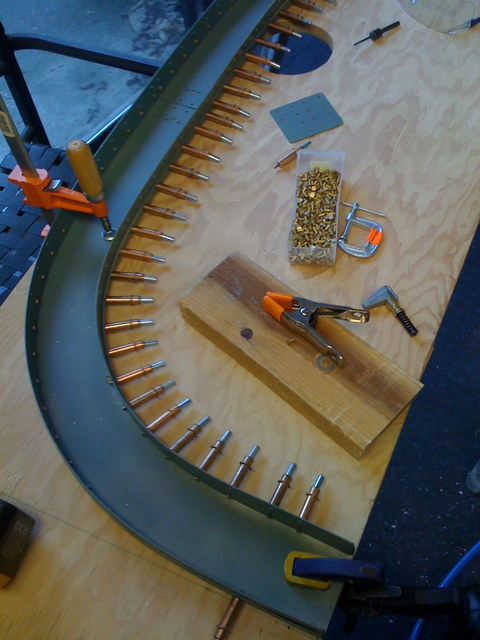
The next part of the process is obvious; you rivet on all the stuff you can with the channels apart, like the attach angle. This is the aft side now, and at this point, I’ve blind-riveted in betwen those sections of clecoes.

When you’re done, you get this. Forward part is all flush AN rivets, aft is CS4-4 blind rivets.
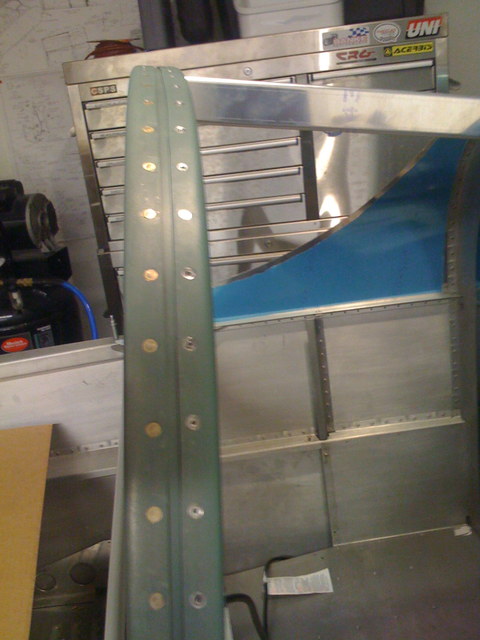
Here’s the result, resting in place. The next part of the op is going to be fitting the attach angles, then drilling/bolting them to the fuselage.

As far as I can tell, the dimensions look good. The angle brackets at the bottom of the roll bar plus the roll bar make up the width of the fuselage at that point. I think I might still have to shave a few thousanths off to match the contour of the longeron, and to keep the skin sitting flush, but it looks good so far.
finish kit unpacking.
Unpacked the finish kit this morning. Not a big deal, but it’s out of the crate and into the guest house. the canopy bubble was the most unwieldy, and that cowling is PINK, yo. So now I have to inventory everything, and soon, before things grow legs and run off.
Some countersinking
1 hour
This morning, I countersunk the F-631A channels. No pics, since this isn’t a very interesting thing, but the process was pretty cool. I set everything up assembly-line style, by putting the countersink cage in the floor-standing drill press and building a fence with a pilot hole out of wood. I gave each hole a swipe with the Boelube stick and was able to knock out all 4 channels. Now I get to deburr the insides of the channels, prime them, and rivet them together. Then I have to figure out the whole attachment to the fuselage. That, friends and neighbors, is going to be interesting.
At some point, I WILL be able to paint the interior, but it looks like Terminator 4 is about to start stealing my weekends from me, so I might slow down on the plane for a bit, but not before I get the roll bar done.
More cabin frame work.
1.5 hours
Not much cabin frame work. Mostly what I did was make the guest house bedroom ready for the influx of finish kit parts. Mike from Partain Transport dropped off the finish kit crate and we got it into the driveway, after a little game of aircraft Tetris in the trailer. My kit was buried under 3 RV-12 subkits and a partially completed RV8 which was on its way to Colorado along with a Super Cub wing. Tomorrow, Dave and I will pop the lid off the crate and put all the bits in the garage or the guest house. The crate itself will become part of a home improvemnent project I’ve been putting off for a long time.
What I actually got done on the cabin frame was to un-cleco the assembly, drill the aft attach bracket and deburr the upper and lower strips. Tomorrow I’ll set up some genius way to countersink the F-631A channels. Then if time permits, I’ll scrub them, rough them, and prime them.
Finish kit arrives.
I’l have pics of this later, but there was a whole lot of aircraft Tetris to get my crate out of the truck, then some other folks stuff back on.