This was what I woke up to on the Intarweb this morning:
Reference
EMP CREDIT 6-27
Delivery location
LOS ANGELES, CA
Service type
Express Saver
Weight
29.0 lbs.
Status
On FedEx vehicle for delivery
Jul 1, 2005 7:25 AM
On FedEx vehicle for delivery
MARINA DEL REY, CA
Now, if the FedEx driver can find my house before he knocks off for the day, it’s going to be a glorious weekend of inventorying parts and prepping the shop!
Kit Incoming!
Empennage ordered from Van’s
and the kit is in transit. Now, why the hell FedEx Ground has to fly my kit all the way to Memphis, TN from Tualatin OR, then on to Southern California is one of those post-Einsteinian conundrums that winds up on the cover of Popular Science with a shot of a blue-white exploding galaxy. My original plan was to drive up to OR and pick it up, but then I did the numbers and figured there’s no way I want to spend that much time in a car. Beautiful drive though.
So. Tuesday, we meet again to see what we can make of the kit.
Things to do: Get some MDF (workbench is currently 2×12’s) and some organizers for the pi
It’s on.
OK, a lot of Nothing has happened in the past few weeks with NOTABLE EXCEPTION. Event number one, I got a ride in an RV-7, that somewhat famous taildragger known as N714D. Dan was kind enough to swap half an hour of flight time for a ride to SMO from his office, so we went up in 714D and it confirmed all my suspicions/expectations of the RV-7.. It’s a joy to fly, it’s fast, it’s as nimble as a meth-cranked ninja on Mars, and it’s rock-solid stable in slow flight. That was pretty much the last nail in the RV box. I’ve been in a couple of composite canards, which were fun, but they eat up runway in a big hurry and if you taxi on gravel, you risk taking a bite out of your prop (yes this happened to me). The RV is an airplane I feel that I can grow with. I’m not the highest-time pilot on earth, so a plane with really good power-to-weight and forgiving low-speed behavior is a definite plus.
Second event, I finished the training kit. No, you don’t get any pictures, because during the course of “learning,” I made a few errors that would have necessitated a lot of backwards steps. But what I did get out of it is a feel for aluminum construction. Not every rivet is perfect, but the more I did it, the better at it I got. There are things you just have to learn by doing, so you can see the results and attach a specific technique to each one. Rivets behave certain ways under different conditions, and it’s more than just an academic exercise. Reconciling what you read in the handbook with the results you’re getting is key. So I think now I’m up to tackling the Emp kit, when it arrives. That brings me to Event Number Three.
Third major event, and the first of hopefully a few more, is I ordered the Empennage kit. It should be here on Tuesday. I hope I have a couple of days to work on it before I get sucked into a commercial at work.
BTW, the rivet squeezer also arrived today. what fun! Of course, the sets they send are pretty much a grab bag. fortunately, I was able to manufacture a flush set from a couple of weird outsized dimple dies. All I did was grind off the point with the trusty grinding wheel and blammo. Flush set.
Eagerly awaiting emp kit.
-stjohn
Good thing this isn’t an RV6
Hey, guess what? I messed up the training kit. Say it with me, kids – MATCH DRILLED -. that means one does not just mark the part and drill the frack out of it. One drills a hole through both parts, clecoes it, moves on to the next, and continues the process until McCarthy is dead (obscure David Gerrold sci-fi reference). So, having learned this, I can still finish this kit, but It’s going to be a constant reminder of the fact that there is no “undo” key on aircraft construction. I’m real close to ordering the Empennage kit. I swear.
First Rivet! Such as it was.
OK, so I’m getting back into the training kit. First full weekend I’ve had in several months. If anybody says to you that doing CGI FX is a cakewalk, think of something anatomically impossible and tell them to try it. It takes your time and your life, makes you fat and turns your hair gray. But I was able to sneak away this weekend (since my stuff’s done anyway) and try to get as far with this kit as I can.
Today we unleash the full power of the radial drill press upon these aluminum parts. The first two pictures show how this thing will contort to match non-square angles. It really makes this stuff easy and I can lay off the air drill for a while.

Head angled, piece clamped to articulated table.

Closeup. I love this thing.
The toolfest doesn’t stop there. Here’s the rivet spacer fan in action:

Notice how it’s way too long. I might order the 10-hole one from ACSpruce next time I need something, which is now. More on that later.

Here’s the spar and ribs drilled and deburred, ready for clecoing.
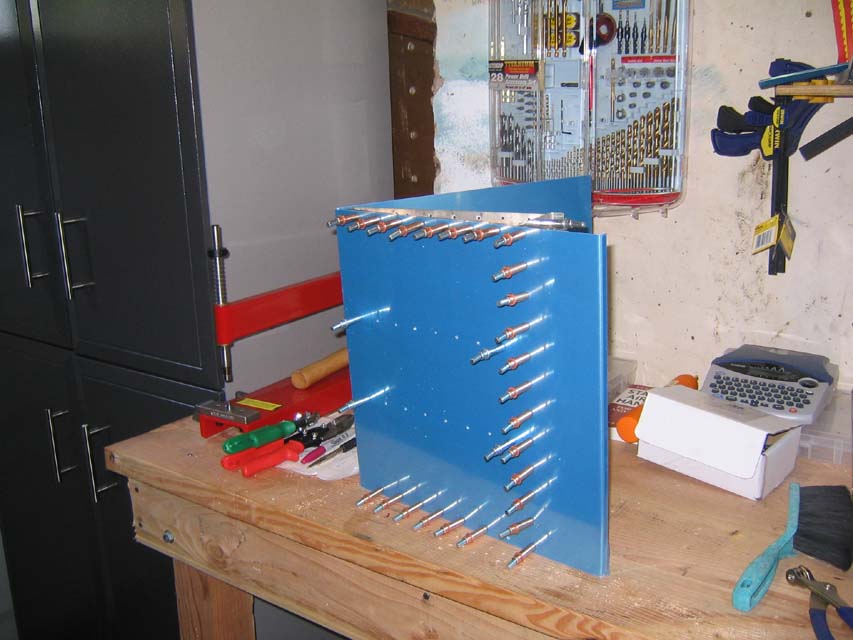
And here’s the skin clecoed to the ribs and spar.

Who’s the dork and what’s he doing? Oh. I see. HE’S BUGGERING UP THE RIBS AND SKIN! STOP HIM!
Too late. Although this looks fine, Yours truly managed to drill the holes in the ribs with a #30 instead of a #40. So this means the skins get riveted to the spars with 1/8″ rivets instead of 3/32. Not a big deal, but definitely a big oops.
FIRST RIVETS EVER! Woohoo! Yay!
Shit.

This is what happens when you dont’ have a back-rivet plate and you try to use a big bucking bar under the skin instead. The work slipped off the bar and the back-rivet set dinged the crap out of the skin and stiffener. Looks like I’ll be bookmarking the replacement part page at Van’s Aircraft.

Yeah, big badda boom. Totally dinged. Discouraging, but not enough to make me seriously consider 7 years of sanding.

One more for good measure. Ouch!
So what did we learn today? Well, for one thing, Home Depot doesn’t have quarter-inch steel plate. Doesn’t have it in any form, other than with something non-aircraft-useful welded to it. Another thing is that trying to cross-purpose tools that don’t like to be cross-purposed will sometimes result in damage. Had this been an actual airplane, the little adventure with the skin and the stiffener would have necessitated ordering a new skin and fabbing a new stiffener. Same with drilling the rib holes out to the wrong size. That’s the problem with repetitive production made easy: you don’t realize you’ve screwed up until you’ve screwed up a whole lot.
It wasn’t all bad, though. Riveting the stiffeners to the skin was OK, except for that one event, and from what the AC Handbook says, they’re good rivets.
We also found out later that it’s probably not cool to run a rivet gun at 11:30pm. It’s freaking loud, especially with the garage door open. My next door neighbor has a concrete block wall between my garage and her house, but I need to think about soundproofing. Moderately effective at best, a complete waste of time at worst. I need to do a sound check, but that involves having somebody in there running the gun while I walk around and check the noise levels.
Tool run!
Went to Harbor Freight in Lomita. Harbor Freight is insanely cool. I was Charlie Bucket in the Wonka factory while they were getting my stuff out of the warehouse. They got EVERYTHING a mechanically inclined mad scientist could ever want or need. So many dangerous and wonderful things to pour money over. Thankfully, the lawyers haven’t litigated hardware stores into the ground like they did with GA, otherwise, I wouldn’t be able to walk out of there with half the stuff they’ve got.
But my 2 main purchases were the 34″ radial drill press and 12″ bandsaw. I didn’t shoot a lot of pix, because the drill press was slathered in machine oil and I didn’t want to grime up the camera too much. But here’s the basics:

the drill press in the box. It’s big, it’s heavy, it’s metal. w00t!

here’s the table assembly. Sort of. This thing is a copy/close relative of the Grizzly/Shop Fox/Craftsman version, probably all made in the same Chinese sweatshop. Table angles 0-90 both ways and rotates 360.

And this is the finished product. This freakin’ thing is HEAVY. The instructions for assembly are less than clear, but if you’re buying one of these, it’s probably safe to assume that you can solve a puzzle or two. The motor is only 1/3 hp, but it had absolutely no trouble going through a 1/8″ steel shelf bracket, and it bored through aluminum angle stock like a laser cannon. The slick thing about it is that it’s got like 17″ of reach, swings 180degrees, and the head can tilt 45 one way and 20 the other or something like that, so there’s not too many parts I can think of that I can’t put a drill to at the proper angle. Let the fabrication begin!

Here’s the bandsaw in its box. I think I saw this on somebody else’s RV site, and I liked the fact that it has a 12″ throat and that it’s very, very cheap. Although in the store it was $20 more than on the Internet, it was still worth it. Having said that though, this thing is one of the most poorly made pieces of gear I’ve ever bought. The manufacturing quality is right up there with die-cast metal toys. The paint is already flaking off the metal table, and the fit of the parts is crap.

Still though, once this was assembled, I was able to manufacture a stiffener like the previous ones in about six minutes, because crap as this saw is, it goes through thin aluminum like a blowtorch through lard.
Pics from last time.
I promised you some photos, and here they are. Not very interesting, but it sure is fun for me!

Picture of the grinder with the wobbly scotchbrite wheel.

Here’s the C-Frame dimpler with the 3/32 dimple die installed, Not that you can see it, but it makes this:

A drilled, deburred, and now dimpled stiffener.

This is what happens when you put your finger over the flash to keep from blowing out the image.

And this is a closer look, with no flash. You can see the dimpling. It’s amazing how the proper tools can make something look like it was manufactured instead of hacked together in a garage.

Here are both stiffeners, dimpled.

This is what happens to a lowly wood planer when you try to use it to shave down a scotchbrite wheel so it balances. You get a ruined planer and a slightly less wobbly scotchbrite wheel.

After installing the home theatre stuff properly, I was able to liberate this shelf from indoors. The missus hates it, and it no longer supports the video projector, so now I’m throwing tools and some non-RV related crap on it until I can build the shelving system of my dreams. Such as they are.
more practice kit fun.
My shipments from AC Spruce, USATCO, pan-american tool co, and others are trickling in. I now have the scotchbrite wheel, 3/32 and 1/8 dimple dies, the c-frame dimpler, the right countersinks, and some cleco clamps. The Scotch-brite wheel is freakin’ magic, it makes sharp edges silky nice. Unfortunately, it’s not all that well balanced, so running it makes the grinder try to walk off the edge of the bench. I realize that you’re supposed to bolt the grinder down, but if I do that, it’s just going to shake the shit out of everything on the bench. I read somewhere, maybe it was Checkoway’s site, that you need to take an old coarse file and file off enough of the wheel to smooth the vibration, like balancing a tire. Waste of good scotchbrite, but whatever. I tried doing it with a planer ($9 from HD a long time ago) but all I ended up with is a useless planer. Gotta do what you gotta do.
I haven’t shot any pictures today, since it was all about cleaning up the space, but then something took hold of me and I drilled, deburred, and dimpled the two stiffeners I’d made last time. Then I drilled and countersunk one of the rib sides. ARe ya supposed to drill or countersink ribs and spars? Well, I don’t have a squeezer, and I couldn’t get a good angle on the rib flange with the c-frame, so I countersunk ’em. Maybe this is bad, I dunno. I’ll tell you one thing, though, deburring both sides of the holes down in the skinny end of the rib where the flanges run together is a beeyotch. I also found out that a dremel (black and decker rotary tool, to be specific) does a half decent deburr job with a pointy stone bit in there, but if it gets loose and chatters, look out.. I think i’ll stick with the countersink-bit-in-the-cordless-screwdriver gambit.
The other ‘doh!’ I had was when dimpling the stiffeners, I dimpled the first two holes the wrong way. I didn’t see this covered in the Handbook but I don’t remember anything about what to do when you seriously arse up something this fundamental. What I wound up doing was pounding it flat with a flush set/die and redimpling it in the proper direction. Probably a no-no right up there with dating your sister, but it seems to accept a flush 3/32 AN426 rivet just fine.
I’m going to go back out there and shoot some pix, then post them later.
Here’s a new entray
empennage, empennage, empennage.
Working on the training kit.
Sorry it’s been a while, but it’s been a while, you know? Anyway, got started on the training kit.

Cleaned up the garage, got everything set. This is the new bench grinder.

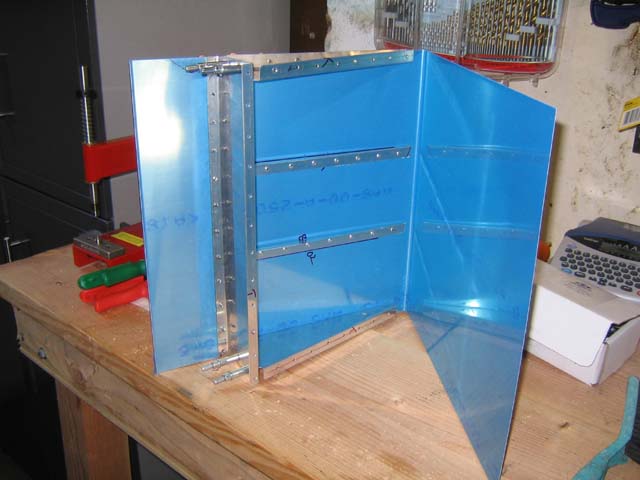
Spar and ribs drilled. My first two clecos ever. Woohoo!

spar and ribs clecoed together.
The suck part about this is that I forgot to break the edges and didn’t exactly know what the hell I was doing with the deburr tool, so I wound up unclecoing (is that a word?) these and deburring them, properly this time. BTW, the grinding wheel without a scotch-brite wheel sucks for deburring. All it does is make lots of secondary burrs that you have to get rid of by other means.

My first stiffener. Keep it clean, folks. My metalworking skills have gone into the toilet since I last did any, and to give you an idea of when that was, “What I Like About You” by the Romantics was on Billboard’s top 40. It ain’t pretty, but it’ll get the job done. If I understand the idea of the stiffener, the taper is so metal doesn’t touch the skin on the other side, the angle just stiffens the part of the skin on the side to which it is riveted. I could be wrong, I frequently am, but something tells me metal rubbing on the opposite skin is a no-no.

Blown-out flashed image of my bad metalwork. Here you can’t possibly see that my skill with hand shears deteriorated to nothing, and you can’t see that these edges are going to need a lot of cleanup before they’re serviceable.

This pic shows the stiffener edge a bit better, but doesn’t reveal much. Suffice it to say that I went over it again with the deburr tool (properly this time), but still have no scotchbrite wheel.

Different day, but same process. The second stiffener turned out a whole lot better than the first, but I really need to be more careful about the plans, because if I go “Oh, I forgot to do that” on the real deal, I’m going to be flying this project sometime in 2024.

And here’s the proof. that little 15 degree cutback on the front edge of the stiffener that I conveniently didn’t see earlier. It’s on the lower one, but not the upper. But at this point I was tired of going round and round with the grinding wheel to try to get a nice smooth edge.

And here’s the grinding wheel. Bet your hindquarters I took the safety guard off. Now I can actually put metal on the wheel at angles that are actually useful. I wouldn’t try this if I was working steel. But this wheel is going to be where the Scotch-Brite wheel goes anyway, so I figure i’d try it.
Next time: 2 more stiffeners, and a lot of drilling, filing, and if I get it together, some dimpling and dare to dream, riveting.