6 hours.
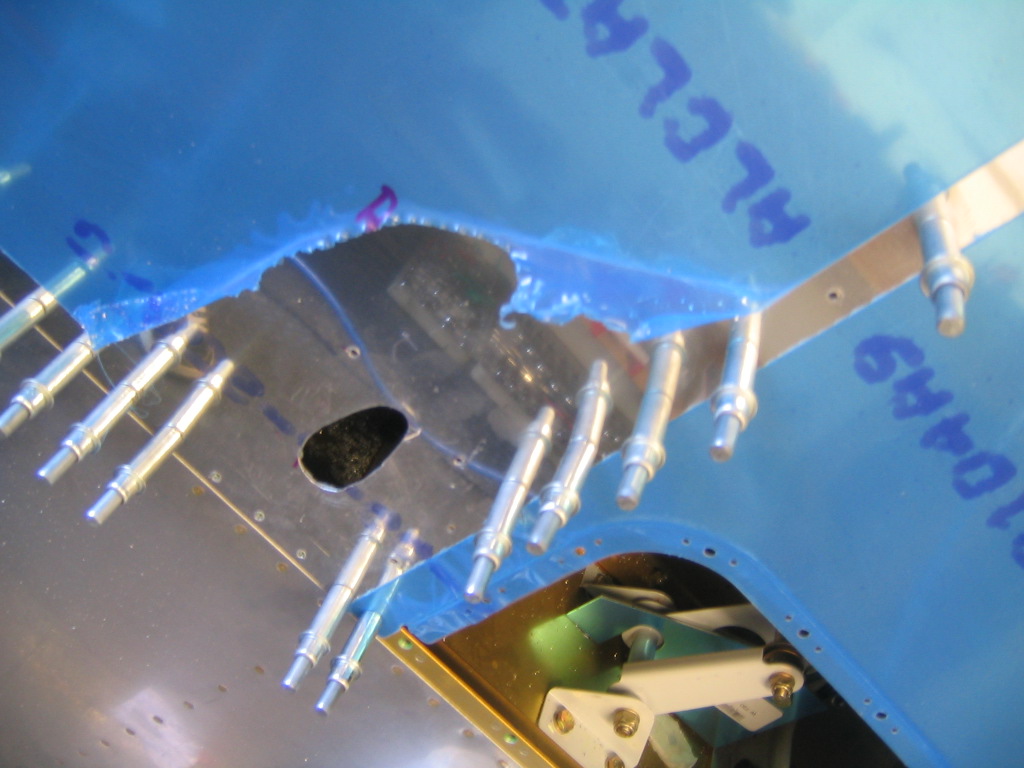
A few things happened over the last few days, but I’m going to lump them all into one entry rather than a lot of little fiddly bits. Got the right flap installed. Went faster than the left one, since there was a little less puzzling about what to do. I also managed to do the end rivets with AN470’s instead of the CherryMax rivets you’re supposed to use (if you’re quickbuilding), so I’m pretty stoked about that. The hinge pins go in easily enough, with some resistance, but I can push them all the way in by hand. I also drilled the right bottom skin. Still need to deburr/dimple both bottom wing skins, but that can wait. Yesterday, my SafeAir1 pitot mast came in the mail, so today I drilled it to the skin and spar. Cutting the hole for it was a breeze.. i got the metal bit for my RotoZip and it did a fine job. Again, still needs deburring. The Pitot mast is raw steel, and it had some rust scale on it, so I had to sand the hell out of the inside. I’ll sand it again and paint it this week. It won’t need to go in until I close out the left wing, which won’t be for a while. I picked up two 10′ lengths of 1/2″ pvc for wing conduit, now I just have to spend some time fabbing brackets to mount it to the ribs. Since I’ll be using the conduit for wing wiring, I can use both the pre-drilled and grommeted holes in the ribs for the Dynon pitot/AOA probe’s tubing. The probe should arrive in a couple of days. I’ll probably drill the probe to the mast, paint the mast, then put the whole thing away until bottom skin time.
Here’s the hole for the pitot mast. There’s a nice scratch near the hole where the bit slipped. I guess we’ll be sanding and priming that area.
Here’s the RotoZip. The plasting tube sticking out goes to an adapter for the shop vac. Sucks the dust out while you’re running it, but it also gives you a good look at the bit and where it’s going. Just don’t be looking down that tube up close without eye protection or bad things will happen.

Here’s the mast, test fit.

Tomorrow, Dan Checkoway and Debris (a TC in training) are coming out to have a look at my work, so I got the skins unclecoed and got the tail parts down out of the rafters for them to look at. Some of the metalwork is downright embarrassing, but I’ve been trying to follow the rules (edge distances, no pillowing, etc) and I think it will be safe, just not pretty in some places. Like an old Volvo. But the most obvious question here is why am I resting the rudder and Vstab upside down on the floor? It’s not on the floor, it’s on a layer of folded up packing paper, and it’s the only way to lean the assembly against anything. The vertical stabilizer doesn’t really weigh much, and the skin around the counterbalance is pretty thick, so there you have it.

Tomorrow, I’ll report all the gotchas the TC’s find that I didn’t catch. Hopefully the list won’t be too long.
Oh, and if you’re reading this and you haven’t already, join EAA. Do it right now. http://www.eaa.org
Right flap and pitot mast.
Left flap attached.
6 hours.
Left wing: installed flap brace and flap hinge, aligned flap. This was a bit of a quandary, and I might wind up redoing this, and here’s why: With the aileron in neutral, the flap, based on where it was drilled, is about 1/16 short of the trailing edge of the aileron. Now, I drilled the flap hinge on this way because I wasn’t comfortable with the amount of distance from the rivet to the edge of the hinge. I’m going to go out on a limb here and guess that as long as the other flap is done the same way, it’s not going to affect flight. A lot of folks on VAF wound up getting the next wider type hinge for this op. I’ll ask Van’s what they think, but it seems silly to have to get a different type of hinge than the one included in the kit just to give you edge clearance between the rivet and the edge of the hinge. So here’s what I did: I used the ‘Dan’ method of using keeper rivets to hold the flap brace and the skin together while I clamped the hinge and flap to the skin and brace. After drilling the hinge is done, you drill out the keeper rivets and countersink the flap brace just like the plans say, then you put the whole shebang back together like you’re supposed to. One mild-to-medium suck: My cheap Arrow blind rivet squeezer won’t take a 3/32 rivet, which is what the CR3212 CherryMax rivets on the ends of the flap brace are. I think I can make at least 4 of them happen with regular AN470AD4’s, but I’ll have to either find a decent alternative or get a rivet squeezer capable of dealing with a 3/32 shank. Other than that, it’s all good. the flap moves freely, the pin goes in without too much trouble, and the end result looks suspiciously like an airplane wing.
Here’s one of a keeper rivet and the clamp on one end holding the hinge in position. You progressively drill and cleco your way down the line. Then you can take the clamps off.

Gap between flap and aileron is the plans-specified 1/4 inch. My camera doesn’t do macro, so it’s a blurry mess. I spent the money on a plane.

Here, we’re looking down onto the rear spar. I used a slew of AN470 rivets to hold the brace in place on the spar while I hung and drilled the hinge. This shot is right after I’d gotten all the hinge holes drilled, except for the keeper rivet holes, which got done later.

Here’s the finished deal. By ‘finished,’ I mean everything done except the line of holes in the bottom outboard skin, which is currently clecoed on temporarily.
Here’s the big picture. The outboard bottom skin is clecoed on, ready for drilling. I need to get this out of the way so I can stow it while I have fun with conduit and pitot lines.

Bellcranks, ailerons, and some pics.
6 hours.
After some adventures in tubing, it was time for some good old-fashioned mechanical hijinks, this time involving the bellcranks. Since I’ve got the quickbuild kit, the build sequence is, uh, fragmented. Supposedly, during the wing build, the plans and manual stop holding your hand and you need to just figure stuff out, which is fine, but it really makes you double-triple-quadruple-check everything before you cut metal or stick it together. In this case, the tubes and the aileron brackets were two discrete operations that were done separately. The aileron brackets (wing side) I did a couple of months ago while waiting for some rudder parts to arrive, and the tubes I did last week. This week, it was all about the bellcranks, which were good old fashioned meat-and-potatoes mechanical fun. I did have some issues cutting the aluminum spacer tube, which you are given just enough of to do right the first time. In my case I had to grind off extra material on the ends to get a flat end, thanks to my cheesy bandsaw, which is probably just more out of alignment than anything else. I had enough tube to get the left aileron on, and get it hooked up to the bellcrank via the short steel push tube, and I think it works OK, no binding, free motion. The good folks at Bill’s Air Center were nice enough to give me a cat-food can of aviation grease for the brass bushings in the bellcranks. I didn’t finish all the stuff on the right aileron though. I don’t have enough aluminum .058 wall 3/8″ tubing to make the spacers for it, so it’s on there in a temporary fashion until my spruce order shows up. But both bellcranks are in, lubed, and torqued, so we’re ready to rock.
Here’s the left aileron, in place, bellcrank installed. The blue piece near the bellcrank is the jig to hold it in the neutral position while aligning the aileron:

Close up of the aileron bracketry. Got good rivets on the pushrods, thanks VAF! The alignment of the ailerons is probably bogus, but here’s how I did it: The distance from the white aileron bracket on the aileron to the top of the reinforcing angle on the wing is measured with a micrometer in two places, down near the hinge and up near the end of the angle. When the measurement is the same, or within a few thousanths of an inch, that’s where the neutral position is, and the threaded bearing at the other end is adjusted accordingly before getting bolted to the bellcrank. I’m sure this will change, but it’s OK for now:

This is a shot of the right side bellcrank assembly. No jig on this one, I think I only got one and it’s on the other wing, unless it’s floating around in the bottom of the canoe which is where I’m storing a lot of parts until I get some shelves put up in the shop. I hope to finish this process this weekend while I’m working off turkey and stuffing.

Bunch of stuff.
4 hours.
And that’s a rough estimate, because I’m going to tally up the last 3 or so days with this entry. After I puzzled and puzzled until my puzzler was sore, I figured out that the only way these push tubes are going to get painted is if I just paint the bloody things. Many things were suggested, most of them variants on “blow a lot of paint in the tube and swirl it around.” This turned out to be the way to go, except when I poured some from a can into the tube. Oh, and important safety tip: Those red plastic cups people swill bad margaritas from at parties? They melt when paint hits them. “Use a cup to catch the excess,” was the advice. I should have thought about what happens when a volatile solvent hits a cheap plastic cup, but instead I spent 20 minutes power-washing spill off the concrete. A soup can was a better pick for that task afterward. So with that done, I moved on to the actual hardware. Fascinating setup, the bellcrank assembly. Drilling out the brass bushings was interesting, but I got that all done without too much trouble, and the only thing I fouled up was making the spacers for the aileron hinge bolts.. No biggie, got a length of 6061 5/16.058 tubing coming from spruce this week. Got one done correctly, and I should be able to finish the other in short order. But the left aileron fits on great, of course I’d expect it to, it’s a QB aileron. the bellcrank works, and everything moves freely. I have to get into the manual to see how to initially set up the push tube adjustment before I go tightening everything down on the bellcrank assembly. The next thing to do, past the right aileron, is the flap braces, then the flaps. Then I have to figure out if I want to do a return line for a fuel injection system.
Pics soon.
W-818
.5 hours
Didn’t do much, cut the push tubes to length for W-818. Most of this was prep, as in, finding a safe, soft place for the VS and rudder, cleaning up the shop for a fresh start, and locating all the bits and pieces. For the record General Tools sucks. I have their pipe cutter and the plastic knob for tightening it cracked at the base, so now i have to use pliers. When I get round to it, i’ll drill a hole through the center for a pin, or find something like a faucet handle with a setscrew. I don’t want to make tools, I want to make airplanes. Still have to come up with a genius way of priming the inside of tubes. Something involving irrigation spray heads and rubber tubing, I think.
WINGS!
2 hours.
First legit entry in the wings category! Not because I’m finished with the empennage or anything, but here’s how it goes: After doing some tests on some scrap with both JB Weld and 3M 5200 Marine Adhesive (recommended somewhere), it became evident that neither of those substances were going to hold up during back-riveting the trailing edge of the rudder. So I bit the bullet and ordered a pint of proseal from Spruce, which should be here in a couple of days. I’m not about to mess up another rudder, this one’s gotta be the one, so I’m going to bond the TE together against an angle piece, then rivet just like the book says when the proseal bond cures. But while I’m waiting for that to show up, I have the rest of the airplane to work on, so I went for the aileron brackets. This is out of sequence, but also in that Spruce order is my drill jig for holding tubes in place in the drill press, which I need for the aileron pushrods, among other tubular activities. Everything went well, except for I got a little carried away with the countersink bit and countersunk more holes on W414A-L than I should have. So I’ve got an email into Van’s to see if this is kosher or if I need to order a new one. Since this is the attach point for a control surface, I’m guessing they’ll tell me to suck it up and rebuild it. No big deal, it’s not a huge piece, and I haven’t drilled it to the wing yet. But I went ahead and finished it using AD426 rivets along the countersunk row just in case they tell me it’s OK.
Inventorying
4 hours.
Ahh, the excitement of inventory! Most of this was done last thursday, after the kit arrived, but I procrastinated a little when it came to all those little bags of parts and hardware. I was unsure how to do this at first. The packing list seems to reference all the sub-sub-subkits, so you get a lot of the same hardware in several different bags. Do I organize a particular fiddly bit based on its relation to the kit, like Van’s packing list or do I just file everything in its appropriate drawer based on AN/NAS number? I went with AN/NAS number, because the packing list is the only place where the relation to the kit is mentioned. The manual and the plans don’t care. So I bought some stacking hardware drawers from HD and started labeling. It sits well with me. The plans call stuff out and I know which drawer to open. it’s good, and I’m sticking to it. it also has the added benefit of letting me know when I need to order more of something. I’ve already cannibalized a couple of plastic bushings for the wiring of the HS trim servo. You actually get two packing lists. One itemizes the total contents, listing the bags of hardware, the other itemizes all the bags of hardware. So my system is this:
1. Check off the parts and bags of parts on the first list.
2. Check off the contents of each bag on the second list
a: put parts in appropriate drawer
b: mark bag off on list and throw bag away.
Anal, yes, but I realized that the number one time-waster on this project (besides blowing it off and raging about town with my friends) is the act of looking high and low for something that should be in a well-marked and easily accessable place, all the time, every time. Same goes for tools, but I’m trying to keep everything I need for a day’s work in a big Stanley toolbox and only go for the rollaway when it’s time to do some specialty work. The fewer places I have to search, the faster this project will get done.

Here’s an overhead shot of the canoe. For most of the inventory, I was able to sit in the pilot’s seat and mark off the packing list. Not nearly as comfortable without seats, these RV’s.

Choose! (2 hours)
Choose deburred elevator edges, choose dimples, choose nutplates attached to trim tab reinforcing plate, choose trim tab access cover drilled and deburred, choose the trim tab reinforcing plate riveted to the elevator skin.
Choose something else to break up the monotony besides ripping off ‘Trainspotting’ for a blog post. But this blog post is significant because this week i got a letter from Van’s announcing the commencement of my QB construction. Delivery date is expected to be June-ish. So I need to call Tony Partain to make shipping arrangements, then make a hole for the kit parts, build the wing cradles (yes, i’m making two so they can flatten against the wall), build the fuselage rotisserie, and of course, finish the empennage. I still don’t know what engine I want, so I haven’t ordered it yet, but I’m thinking about installing the Sam James cowl and plenum. 7-10 hp for around 2 grand? I’ll take it. Beats 8 grand for 20 more ponies.
Come to think of it, the IO360-A1B6D with 3-blade constant speed prop of my dreams has been knocked down a few pegs to a vertical induction IO360 parallel valve constant speed kit engine, most likely an ECI IOX variant. I need to find a builder, although a friend of mine is an A/P and maybe giving him a couple of grand to help me stick a kit together would be the way to go. The bad part of that is, I have no facilities to test run it, and no way am I going to wind up like this poor bastard.
Fun and games aside, there is a lot to be done before the kit gets here, but it’s good to have activities. Keeps me off the streets.
Wings
Wing progress here