« Posts under Finishing

I like to move it move it. Moving Day, Part 2

4.5 hours.

Moved!

David arrived at 8AM this morning and we drove the loaded truck up to Oxnard. This was not a fast trip, and the seams in the 405 freeway are exactly the same distance apart as the distance between the front and back wheels, so anything over 40mph made the truck bounce like mad. Once we got to the 101, it was much better, but it was still slow going.

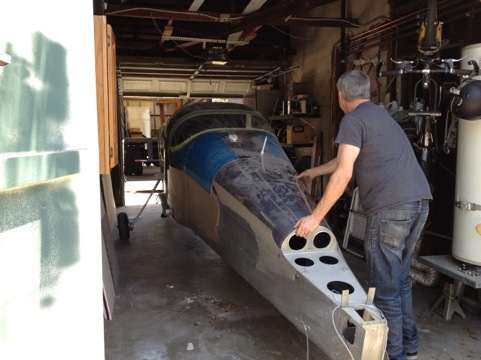
Once at the Oxnard airport we made our way to hangar C38, where my plane is now getting to know its new roommates; a yellow Luscombe and an RV-9 slider under construction.

20130505-100350.jpg

20130505-101156.jpg

20130505-101221.jpg

I like to move it move it: Moving Day part 1

7.5 hours.

Today is The Big Day, Part 1:   Moving to the airport.   This morning, I finished up the crotch strap bracket on the left side.   The right side, not so much.   I didn’t even get into it because I knew it’d take far longer than I had, and I wanted to transport the airplane with the interior assembled.    So I finished up the bracket, then started prepping the house for the impending load-out.

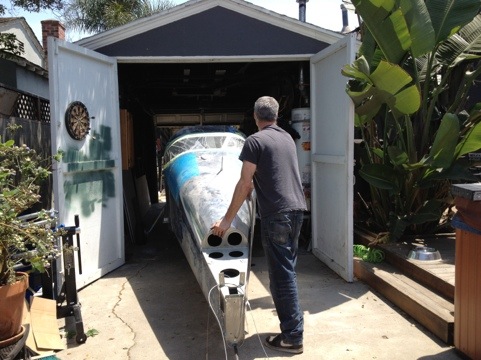
20130504-105023.jpgThis RV7 stands 7’2″ wide from axle nut to axle nut.  The garage doors are nearly 8 feet wide, but the issue is the hot water heater stand.   It pokes out into the space about a foot.  What it does is reduce the available pathway from around 8 feet to 7’1″ and that’s a showstopper.   So being clever (never confuse clever with smart.), I jacked up the heater stand, took off the inside legs, and supported it with jack stands.  This allowed the right wheel enough room to get the camel through the eye of the needle.

20130504-105102.jpgThis might look unsafe, but it’s not; there are huge metal straps holding the tank against the wall.

20130504-105123.jpgRemoving the washer, dryer, and guest house range revealed the mess the guys left when they demoed the bedroom walls.   Nasty.

David arrived at 11am, and when I finished getting crap out of the way and zipping up the interior, we headed over to Marina Boat and RV storage to pick up the cube truck.   I had originally booked a 22′ truck with a lift gate.  This one is a 24 footer;  and we definitely needed the extra two feet.

20130504-120539.jpgThis is without a doubt the largest vehicle I have ever driven.   I need to look up the stats, I don’t know if they were supposed to rent me this without a CDL.   But oh yes, it has a lift gate.

Paulus and Ellen arrived around 1:30 and with both Paulus and Dave helping, we got the tool chest, the workbench and the plane onto the truck in less than an hour, mostly thanks to that lift gate.  The lift gate is both brilliant and dangerous: It has the potential to mangle appendages, crush bones, pinch skin, and ruin your stuff.   David said that on a film set, something like 30% of all injuries are caused by folding lift gates like the one on this truck.  Whatever, it’s totally worth the risk.   That thing is genius.     The tool chest and workbench were just a warmup for the main event: the fuselage.   That was interesting.   We had to make lots of weird little turns to get the thing out of the shop and into position where it could roll toward the little garage.   At least I didn’t have to knock the wall down to get the thing out.  Some builders have.

GPS_TestOnce the ship was under open sky,  I fired up the avionics.    This has plagued me for months:   Did I wire the ARINC429 communication between the EFIS and the GNS430 correctly?   Did I install the GPS antenna properly?   For the first time since I’ve owned it, the GNS430 locked on to a satellite constellation and began speaking to the EFIS, so yeah, I’m awesome.

20130504-193443.jpgWith tests complete, we started rolling the plane toward the lift gate.   Shelley took some shots, which is nice, because I wasn’t about to stop and do it.   At this point, we’ve just made it past the hot water heater.

20130504-193507.jpgLining up on the exit…

20130504-193518.jpgMoving forward, at a pace reminiscent of the giant crawler NASA used to move the Shuttle to the launch pad.

20130504-193533.jpgThe lift gate made this dead easy.   All we had to do was get the main gear as far forward as we could, then I lifted the tail while David raised the gate.  After that, it just rolled right in.   This is why you use the Penske trucks instead of the U-Haul: there are no wheel wells or fuel tube humps to deal with.   The truckbed is flat and made of wood, so you can do things like screw 2×4’s into it with deck screws.

The rest of it was what Dave called “Tetris: Homebuilt Aircraft Level.”   The rest of it was us loading, strapping, and securing.   Oh, and we forgot the prop, so we had to shuffle some things once we remembered the giant wooden prop box skulking in the corner of the shop.

We knocked off around 5 and buttoned up the truck.   I had dinner, walked the giant furface you see in the first pic, then put everything back that I’d extracted from the garage earlier to make way for the airplane.   Now I’m beat, my feet hurt, and I’m going to go sit in the hot tub.   Tomorrow, we hit the road at 8:00AM.

Cowl Fitting 6, 7

13 hours.

This counts last weekend as well, and I suck for not making the update then, but I had some pressing stuff going on. Anyway, more stuff happened on the cowl, mostly fitting, shaping, and the drilling of hinges.

Before I get into all that, I’m going to post some photos from the last entry.


To rough in the landing gear cutouts, I had to use a piece of angle, where I marked the distance from the center of the airplane to the landing gear leg.


The idea was to transfer that measurement to the bottom cowl to mark the approximate place the landing gear cutouts needed to be.


Like so. Although, the fiberglass flexes so much any measurement would have been approximate at best, so I left plenty of room for error. Fiberglass isn’t like metal, if you cut too much away, you can build it back up, but it’s a pain in the ass.


Remember I said I did a lot of hinges? Here’s one almost done on the bottom cowl. This is a piece of piss. Cleco-clamp the hinge to the edge, drill 1″ holes along its length. Easy.


The side hinges weren’t too bad either.

But the fun comes with you have to drill holes in the fiberglass on hinges it covers up. This is where the new pink cowl with its honeycomb structure help a lot. What I did (and I learned this from Bob Collins, thank you Bob!) What I did was put the cowl on, and fine tune the fit with some of that PVC tape I had lying around. It’s great stuff, super strong, and doesn’t have all those fibers like duct tape. Then I stuck a light up inside the cowl, pointing at the hinges, which I’d already drilled holes in.


With the light inside, the holes in the hinges light up the fiberglass and gave me a really good drill guide to complete the task. The first one sucks. You have to somehow hang on to it and make sure the drill goes in right, otherwise it can oval out the drill hole.


The desired result is Clecoes holding the hinges all the way up and down the line.


More or less like this.


The other fun bit is figuring out what to do with the hinge pin. I have to drill a slot for it to enter and exit the hinge, and I’ll have to conceal it later.

Like an idiot, I didn’t cut out the oil door per the plans before starting the hinge fit. It didn’t seem to have any ill effect, but after the hinges were drilled, I took the cowl apart and cut out the hole for the oil door.

But I didn’t get much past this part. It was Oscar night, and we in the movie biz make a big deal out of it. It’s also cool to have 5 friends nominated this year.

This week was killer, so I got nothing done. But today was pretty solid.

I didn’t get a super-early start today, because I took simba down to Marina Del Rey for his walk.

Today, I riveted the hinges to the cowl.


The blue light from outside on the pink cowl makes everything look like it was shot in a Miami disco in 1983.


Riveting these was tedious and repetitive. Like these photos.

But eventually all the rivets got done, so I started working on the inner flanges, which get platenuts riveted to them and the two halves screw together through them.


The smaller hole was the temporary one I used to hold the two haves together during fitting. it will get filled in when I go into fiberglass mode.

And that’s it. tomorrow, I’ll probably work on cleaning up wiring so I can rivet on the forward deck skin.