« Posts by stjohn

Halloween Horror.

8 hours.

My parts arrived from Van’s last week. A couple of ribs and a HS-710 angle that I had ordered because I was tired of that nagging feeling of something not right in the structure of the horizontal stabilizer. Yesterday, I finally got to drilling the offending part off, with the intention of making a new one that satisfied all the edge distance requirements. This is the old HS-710:

You can see how beat up this thing is, and that’s from me sucking at riveting a long time ago. Not only that, see the holes along the flat part, near where the angle starts? Those holes are too close to the edge of the part. The general rule is that the center of a hole should be 1.5x the hole’s diameter from the edge of the part or another hole. This isn’t even close.

This part is one of four structural elements holding the tail onto the airplane, so it’s kind of important and it has to be perfect. No ovaled holes, plenty of edge distance, good rivets, deburred holes and edges. This part connects the inboard ribs and both spars as well, so it’s all got to fit together in such a way that all those requirements are satisfied. The plans for this section suck, and the design could be better too. This is one of the first things you have to do as a builder, and a fit this important could do with a little more explaining of the whys, and some clarification on the steps. It’s almost as if it’s deliberately designed to get your nose off the paper and understand the structural priorities for yourself, and the lessons are taught in mangled metal and UPS shipments from Aurora, Oregon. The main lesson here is that you have to trim off just enough of the nose rib flange to let it fit between the HS-710 and HS-714 angles, and that it’s better to be closer to the edge on the aft rib than on the angle.

So, armed with 4 years of aircraft construction savvy between then and now, I set about replacing the HS-710 angle and the inboard ribs.

This is the shiny new HS-710, ready to install. The tapered ends didn’t get as much of a taper this time, leaving more metal on the edges. All good, right? Wrong.

Another important lesson: Get rid of all annoyances and irritants before you do anything critical. Find your neutral space. My jeans were falling down (belt not tight enough, getting less fat, good news really), the drill charger fan was running, the psytrance station started playing something screechy, tweaky, and annoying, and the shop vac hose and air lines were completely underfoot. I drilled the new HS-710 in exactly the same place as the old HS-710, through the spar in the old hole. I needed a whole new class of profanity to accurately describe the situation at that point. I didn’t have one. So I threw stuff. Nothing heavy or expensive, but even watching my hearing protectors explode in a bright flash of red plastic and skip across the concrete didn’t satisfy the frustration and disappointment. Even the time I drilled a hole in my finger wasn’t this maddening.

At this point, I wasn’t much into taking photographs. I spent the next few minutes contemplating selling the whole mess and buying a Cessna. Slower, but for the money, hauls more cases of wine back from Napa. But then the ‘F— You’ took over. F— You happens at the darkest hour, when you just say F— You, this is not stopping me. F— You, you are just soft metal. F— You, I will get this done. Today. So I made a new HS-710 from some angle stock. That’s right. Made one. And I can make more. I’ve got plenty of angle stock. We can do this all weekend, so settle in, princess. This time, there was way more measuring than there was drilling, and I now have a fully functional, structurally sound, properly installed HS-710. Here are all 3 HS-710’s, old, new, and new new.

Getting that little bastard on was only the first of the fun things to do. This setup is designed to be assembled before the skins are on, and getting it all together requires some basket weaving and the use of the double-offset rivet set, which is a deep, dire pain in the ass. The procedure is: Stick the aft ribs in, drill them through the spar, then use those holes to match drill the forward rib making sure the edge distance is good. Before you drill that, make sure the skin-to-rib flange lineup is good. Get this part locked down, then do the skin holes. But riveting the flanges to the spar is a bitch. The double-offset set likes to walk around, and you really need to secure the assembly and keep the set seated or you’ll mangle the rivets and that will mean drilling out and possibly enlarging the holes. Trust me you do NOT want to go up to an AD5 rivet in there. The rivet gun just barely makes it in there to get a good lock on the rivet heads. Like I said, it was designed to be done without the skins in place.

If you get it right, you end up with something like this:

See how there’s plenty of room between the center of the rivet and the edges of the metal?

Squeezing the skin rivets is easy. I even remembered not to rivet the holes for the empennage fairing this time.

Assembled and resting. The next horizontal stabilizer I build better be on the next airplane.

More odds and ends.

2 hours.

I’m waiting for parts from the Mothership, so it’s all about what I can find to do while I’m waiting. Mostly I sat out there puzzling out wiring runs. The floor panels are in already, so I might have a nice game of Go Fish to look forward to when it comes to running wires for 2 GPS antennae (yes, 2, in case I get hold of a GNS 430W), trim servo, strobe unit power, tail light, then strobe wires forward for the wingtip strobes. What I did actually get done was finally rivet the reinforcing angle that the tank brackets attach to just forward of the main spar. I can’t believe I forgot to do that during wing mating, but I think I probably had other things on my mind at that point. So that’s done, and there are little blobs of torque seal on the accompanying thru-bolts to tell me I don’t have to worry about it anymore. Oh.. remember this thing? F-697?


It’s the canopy jettison bracket. I put it on the subpanel because I was just following the directions. Then I realized I’m not going to install the canopy jettison system (weight, complexity, etc). Now I realize that thing might get in the way if I have to chop holes in the subpanel for some deep avionics, like a GNS 430W or some other surprisingly large piece of gear I think I need. So I took it out. You can never have too much practice drilling out rivets.

After that, I fiddled around with the fiberglass rudder tip, and worked on the mounting system for the tail position/strobe. This is genius. At some point, I bought a length of 1/4″ aluminum dowel from the hardware store. What I did was cut 2 half-inch lengths of it, which I’ll drill and tap to 4-40, the same thread as the tail light mounting screws. I’ll put some dimples in the sides of them, then sink them into blobs of flox in the rudder bottom. At that point, they’ll be permanently affixed and I’ll still be able to unscrew them to change bulbs. OH, thumbs down on the build quality of the rudder botttom. The two halves of the rudder bottom don’t exactly line up along the seam, so I’m going to have to clean it up with micro and sandpaper. If I was exceptionally skilled with sheet metal, I’d make my own out of aluminum, but I’m not, so I’ll deal.

Finally, I messed around with the tailwheel springs. I’m going to need to order new chain. I should have looked at the plans. I remember them going together completely differently, and it took me some time to figure out that getting the chain directly on to the spring is no big deal. But the puzzle fooled this monkey, and I missed ‘Castle’ for nothing.

I’m going to pester Tim again this week and see what the deal is with my cylinders.

The Telltale Heart is no longer beating.

4 hours.

Today I started the fix on something I should have done a long time ago. When I first started building this thing in late 2005, I knew FA about how airplane parts go together. I also had pretty weak skills in precision metal cutting. I didn’t know how big the saw kerf was, I didn’t know how much metal would come off from the grinding wheel, and several other things that are pretty much muscle memory now. When I was building the horizontal stabilizer in 2006, I still didn’t quite have the knack of it,

This is what I’m talking about:

This is the forward reinforcing angle that spans the forward spar of the horizontal stabilizer. This part is structural. I probably shaved off too much metal from the bottom when making the angled tab, so that’s what killed me on the edge distance. Then I further beat the crap out of the two inboard ribs during the process of sticking it all together. I sent photos to Van’s of the whole sad-looking assembly and they told me it was ugly but not a problem structurally. Maybe it is OK, but it’s been bugging me for nearly four years. So today I ripped out the ribs and the HS-710 angle. New parts are on their way from the mothership.

It’s going to be rock solid this time, and I know that because I now know HOW those parts are all supposed to fit together, so I’ll have a drilling and riveting strategy that insures everything has the proper edge distance. I also have a tungsten bucking bar that I didn’t have before, and I have a decent array of skills built up over the last 4+ years so I think I can rivet the new pieces together without giving them that hand-hammered bronze-age look.

Fun with the Firewall

5 hours.

I can walk around that plane all day long and find things to not do because one of the ducks isn’t in its assigned row. Problem is, the days are getting shorter and I can’t wait for everything to fall into place. The firewall has been one of those things. I still need to make holes for wire pass-throughs, and bolt various things to it, some unknown as to their specific configurations and form factors. But sometimes, you have to make a move. Today I fire-sealed the cabin heat box and installed the firewall recess.

This is halfway through the process. The cabin heat box is done, and the battery box is in place. , All the gaps and openings need to be sealed up in case there’s an engine fire. A gasoline-accelerated fire in the engine compartment fanned by a 200mph gale would make every hole, crack, and gap a 2000-degree blowtorch aimed right at the occupants’ legs, something we’d very much like to avoid. I’m using 3M Fire Barrier 2000 in all those cracks. Hi-temp RTV is rated for 700 degrees, this is rated for 2000.

Hopefully this won’t be an issue. You’re not supposed to use rigid tubing from anything fixed to the airframe to anything attached to the engine. The reason for this is obvious: the engine vibration will fatigue and split a hard line in a fairly short amount of time. This is why you’re supposed to use braided steel and flexible, firesleeved hoses for fuel lines between the firewall and the fuel pump.


Since I was fire-sealing everything, I figured why not, let’s put the engine mount on. After sealing the lower firewall corners and the brake reservoir, I got the engine mount on, permanently. I considered being a showoff and putting the plane up on the gear, but then I realized I’d omitted a rather important detail: I’d forgotten to notch out a section of the lower firewall corners to make room for the gear legs. Not one of my prouder moments. But I was able to scribe out a section to remove, which I did, and it would have been really easy if it hadn’t been for the fact that stainless steel sucks to work with. It bites, so you have to file the edges down. It also hardens if you heat it up, with something like a Dremel burr. Finally I was able to get some notches done, but they’re not that pretty. That’s what gear leg fairings are for though, right?


Here’s the firewall recess all riveted in. There’s a bead of fire seal under the flanges in addition to the seams in the recess. I hope that goop doesn’t run too much before it cures.

What happens next? I don’t know. I have the rudder available to work on, maybe I’ll do the taillight.

Landing gear put together.

2 hours.

That’s not saying it won’t come apart again. It’s currently in this state:

I think I’m not kosher on the amount of threads showing on the bolts holding the wheel pant bracket on one leg, but I can sort that out tomorrow. But I have this theory: If things are assembled with all the requisite parts, those individual parts are less likely to grow legs and wander under appliances and places of storage to hang out with the dust bunnies. It’s like the Phantom Graveyard of Lost Hardware under there, like that scene in Heavy Metal when the B-17 crash lands on the island full of derelict planes, abandoned spaceships, and zombies. But instead of zombies, I have an assortment of fasteners and other hardware.

The gear is ready to rock, but I need to get fire caulk so I can finish up the firewall installation stuff and put the engine mount on. Then I can put the plane on the gear, just for a hoot . Tailwheel’s on, why not give it a test roll?

The engine is still at Tim’s. He’s backlogged, and my engine is all torn down, waiting for inspection. I’m not in a hurry, but I am in a hurry to find out how things cost, because I need to know what my avionics package is going to look like. The way my luck runs with engines, I’ll probably have enough left over to equip 313TD at about the same level as Kern and Rinker Buck’s Piper Cub.

Wheels!

2 hours.

Since Dave grew up racing go karts back in SA, it was only common sense that I ask him for some help putting the wheels and tires together. Airplane wheels are a lot like the old-style kart wheels. We made a decent mess with the tire talc, but we got the tubes in and the wheel/brake rotor assemblies back together and torqued. I put some air in them, and left them outside all night, and will check them for leakage later, but I suspect they’ll be fine.

After Dave took off, I started in on the landing gear, just to figure out the brake caliper assembly. The plans are pretty sparse about the actual caliper, which comes as part of the kit from Parker containing wheels and brake calipers. So I’m still puzzling out how to bolt the calipers to the gear legs. I think I got it, but there’s really no drawing showing how to integrate the caliper, gear leg, and fairing bracket. I need to dig into the plans some more, this is kind of important.

Let Them Eat Static.

1 hour.

Finished installing the static line. Much easier to crawl down the Jeffries tube with the flap motor bracket removed. I also made some .063 spacers for engine mount. Supposedly they weld it all up in a jig at the factory, and drill the QB fuselages with the same jig, but maybe the welding process stretches the metal a bit. Anyhoo, I had to make two aluminum washers to go behind the lower middle attach points, which, fortunately, are about .063″ off the firewall when the 4 outside bolts go on. They’re probably not exactly .063″, but they will be when everything is tightened down. I have a good feeling about it. I also got out the fiberglass cap that goes on the bottom of the rudder to see how it might accommodate the Whelen A500 position light/strobe assembly, and the answer is: not that well. There will be a need for fiberglass work here, I think. I’ll have to somehow build up enough material to drill and tap threads, or I’ll have to figure out a way to get a backing plate in there. Neither option looks like fun, but there’s gotta be some light back there or we ain’t legal. I know I promised photos, but I forgot to bring my phone. I’ll catch up with that later.

Back to the fun stuff

4 hours.

Saturday and Sunday were somewhat unproductive, given the gloom-induced malaise and subsequent need to eat (organic) cheese puffs and watch TV, but I installed the VA-168 sensor manifold, the cabin heat box, and most of the static line. The sensor manifold and the cabin heat box will have to come off and get fire-sealed before I can call them done, but I need to find an acceptible fireproof sealer for the various firewall penetrations first. If everything works out right, I won’t have too much going through the firewall. Right now, I can think of some: For holes in the firewall, I’ve got 3 control cables, the brake line fittings, the fuel line fitting, cabin heat, the RDAC (engine sensor pod) cable, main bus power, brake cylinder fitting, and the various bolts holding things on. Fewer pass-throughs sits well with my universal hate for goop of any kind. But the idea is to keep windblown flames from burning avgas, smoke, and carbon monoxide out of the cabin. Dead pilots make bad landings. The 2″ hole for the cabin heat box was less traumatic than I thought it would be. I used a 2″ hole saw on a cordless drill at the lowest speed and plenty of Boelube. The trick with stainless is to go slowly and keep it as cool as you can. If it heats up, it hardens, and it will kill whatever tool you use on it. But care is needed: stainless steel makes an extremely sharp edge when cut, and it’ll go after you with near-sentient aggression. File down the edges, or pay for it later in blood.

The static line is still unfinished. I fabbed a bracket for the T-fitting that joins the two lines from the static ports on either side of the fuse, and I drilled a hole in the angle where the canopy latch bar attaches so I can run the tubing up under the left side longeron on its way to the EFIS. I got the cable clamps installed along the bulkhead, but I haven’t yet installed the bracket for the T-fitting or cut the tubing to length. I also wound up removing the flap motor because there’s no good way to winkle my big ass into the tailcone without some pretty decent contortions. I’m not a huge guy, but I’m not as limber as I used to be, and I have a somewhat irrational fear of getting stuck in a position that cuts off my air supply or leaves me unable to extricate myself without assistance. Once I’m prone in the tailcone it’s fine, as long as I remembere to bring all my tools and parts with me. The motivation to plan the job ahead of time is amplified hundredfold by the sheer amount of work it takes to climb into that space. Oh, and also to remember to go to the bathroom before you get started. I’ll post some photos tonight or tomorrow.

Engine’s going to Long Beach.

1 hour.

Last night I dismounted the engine from the stand and stuck it in the back of the truck. I’m really glad I didn’t throw out the plywood stand it arrived on. Yesterday, I spoke with Tim at Tim’s Aircraft Engines. A standard teardown and inspection is going to be around $6200. Ouch. But whatever, I need a safe engine, right? I have no way of knowing what happened to that airplane between 951 hours (last engine log entry) and 975 hours. It could have been prop-struck, Maybe sat on the ramp and only flown once a month for two years (I seem to remember the seller telling me it was pulled from service in 2001 or 2002), who knows? But Tim is going to pull it apart, magnaflux it, figure out what’s wrong, then tell me what’s up. He can also rebuild my cylinders and put my sump and FI system on it.

At this point, I’m beyond my ability or capacity to mess with this engine. I don’t have the tools to split the case, or check the components properly for wear. And I really don’t trust myself to put it back together, even if I had the proper facilities to do so. A cylinder or two, I can handle. Maybe building up a kit engine from new components. Not this. I’m going to pay through the nose for it, but I will have a safe engine of known condition. I hope. And if I wind up paying 20 grand for the service, i’ll know better next time, and that’s not to buy an engine off eBay without absolutely knowing its pedigree. I bought this engine before I was ready, and when used O- and IO-360’s were relatively rare. So now I get to pay the price, in stress, inconvenience, and a near-spinebreaking torpedo to my savings.

Suckiest of sucky suck things.

7 hours.

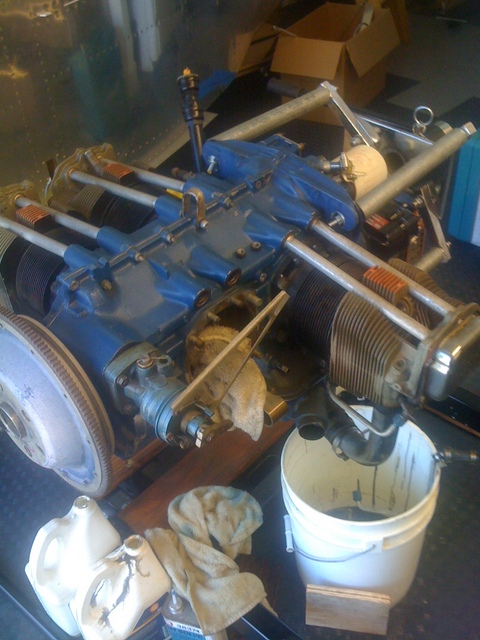
Yesterday, I recovered from my cold enough in the afternoon to get going on the engine. This means I rolled the engine out on its stand into the middle of the room where I could work on it and prepared to take off a cylinder so I could have a look at the cam lobes. This would be the step that determines the way forward, because if the valve train parts are trashed, I have to send the engine in to a rebuilder and I’m looking at the possibility of a very expensive repair, because there’s no way to fix the camshaft or the lifters without splitting the case, and that STARTS at around 2 grand. So off we go. First thing was to de-pickle the engine. This meant draining out all the oil I’d had filling up the case since I bought the engine in 2008. There was oil hiding everywhere in this thing. Even after draining out the oil, every time I moved the crank or tilted it, more would come out from somewhere. But that’s kind of the point. Parts submerged in oil don’t corrode. The crankshaft bore gave me a bit of a scare. When I pulled the end cap off and fished out the old sock that had been shoved in there to keep the oil in (WTF?) I discovered a load of gray sludge in the crankshaft bore. This is lead and oil, congealed into a gray goo, like bad nanotech. At first I freaked, I thought this stuff was from the sock partially dissolving in there. The sock wasn’t dissolving, but the lead sludge was now all oiled up and nasty. I scraped that all out with a wooden tongue depressor and moved on. After I got most of the oil out, it was time to have a look inside. I went for the #3 cylinder, because it was the most accessible. The #1 was obstructed by the governor and bracket. Taking a cylinder off one of these things is not really that big a deal. Follow the manual, don’t lose any parts, and dont’ force anything, you’ll be OK. So that’s what I did.

engine
Lots of rags to pick up oil drips, and another one wrapped around the connecting rod so it doesn’t bash on the case and damage it. This would be bad. To get this far, I had to take the rocker cover off, remove the shroud tube retaining clips, then remove the rocker arms. After that, I could pull out the pushrods, and pull the shroud tubes through the cylinder head. At that point, the cylinder was free to go, after removing the oil drain line. With each one of these steps, more preserving oil dribbled out, hence the progression of rags on the floor. The drip pan doesnt fit under the engine stand, nor is it wide enough to catch oil from opposing cylinders. So what was the point of this? Oh yeah.. have a look at the camshaft and tappet bodies. Maybe that’s Greek to you, but essentially what happens is this: The crankshaft, which the prop is attached to, spins round and round. There’s a gear on it that drives the camshaft, which also spins round and round at a higher speed. The camshaft has a bunch of teardrop-shaped lobes along its length, so when it spins, the point of the teardrop pushes against the tappet body. The tappet body pushes on the pushrod, which pushes one side of the rocker arm. The other side pushes down on a valve, which, depending on its function, lets air into, or allows exhaust out of, the cylinder. The camshaft and the tappet body are a metal-to-metal contact point, which means that for them to work for any length of time, their contacting surfaces have to be as frictionless as possible. This is done by having those surfaces polished to a mirror finish and constantly bathed in oil. However, if there is corrosion on either surface, they’ll grind each other down to nubs, oil or no oil, but before that, the engine will start losing horsepower, compression on the affected cylinder will go down, and metal flakes will start showing up in the oil filter. Keep flying it that way and you’re asking for trouble. Metal bits migrate into bearings, block up oil passages, all kinds of nasty stuff, not to mention that if your valve train fails, you could be looking at an engine-out scenario.

So I was pretty keen to find out how that was. First pass with a bright light and an inspection mirror showed no corrosion, which was what I was worried about primarily. This is a Good Thing. I also ran a fingernail along the camshaft lobe and found nothing. If it fails the fingernail test, game over. Time for a teardown and a regrind on the camshaft, possibly a replacement. I was able to get the mirror behind the tappet body on the cam lobe I’d just checked and that looked good. No spalling, which is mech-speak for tiny dings and chunks of metal beaten away.

At that point I was totally chuffed. I was stoked to only have to replace the cylinders, which I wanted to do anyway, after seeing the compression numbers in the logbook. Something tells me the aircraft this engine came from was flown infrequently at best. So with that in mind, I moved on. This engine was to be converted into a fuel-injected one, changing from an O-360 to an IO-360. I have the Superior forward-facing cold-air sump, and the Airflow Performance fuel injection system ready to rock, along with the high-pressure fuel pump necessary to feed it. So I figured I’d do that next.

fuel pump pad
This shows the fuel pump pad almost cleaned off and ready to have the new pump put on. The old gasket material pretty much baked itself on, so even this little bit of work took a lot of elbow grease with a plastic scraper and a scotchbrite pad. That little round button sticking up back there inside the case between the two bolt holes is the actuator shaft. This is driven by a cam on one of the accessory gears, and with the engine installed, makes installing the fuel pump a royal pain. Upside down on a stand, though, it’s a breeze. I put the fuel pump on temporarily with a new gasket (since I don’t have the proper gasket sealer) and went on to the next step.

Sump off
The next thing was to take off the original backwards-facing sump and replace it with the Superior one. No big deal right? Wrong. Old gaskets suck. They suck so much, I don’t know where to start. Once I was finally able to get the old sump off, after some persuasion, I was faced with the task of removing the old gasket. This is a slow crawl, square millimeter by square millimeter, carving off old gasket material. Can’t use a razor blade. Razor blades are steel. The case is aluminum. A razor blade will shave off case right along with gasket. plastic scraper is best, after loosening up the old gasket with gasket remover. Keep that stuff off the paint, out of the crankcase, and out of your eyes, and plan on being there a while. I’m still not even half done.
Sump off 2
The other good news is that I didn’t find any corrosion in the gear train either. Maybe I don’t know what to look for, but I know what rust looks like and I didn’t find any.

I took a break from gasket scraping for a while. During this break, I don’t know why, I went to have another look at the cam lobes, just to make sure I wasn’t dreaming. I’m both glad I did and really bummed out at the same time. The engine was rotated to a different position by this point, one which got the exhaust lobe on #3 into a different position. Also with the engine back upside down, it was easier to get light and mirrors in there to have a look. So I did. Sure enough, the lobes were good, as far as I could tell. The tappet body I checked earlier was fine. But the next one over, the exhaust tappet on #3 was not. I could get my finger between the lobe and the tappet surface, and I could feel something. I got the mirror in there, and bang, there it was. The tappet was a near perfect match for the picture in the lycoming overhaul manual captioned “starting to spall.” About a 1/8″ square area was pitted and rough, and It wasn’t the Rockwell marks either. So there it is. Pretty much a day out the window, and potentially quite a few thousand dollars. Any spalling of the tappet bodies means they need to be replaced, and the camshaft now needs to be inspected with at least 10x magnification. So now I know what to do next: Find an engine shop and get it torn down.

In retrospect, perhaps it would have been better to just buy a crate engine from Mattituck or Aerosport, or even Van’s, or maybe buy a zero-time rebuild from one of the various engine suppliers out there, but this combination was going to be mine. 6th order counterweight, no rpm restrictions, front-mounted governor, forward-induction. It may very well cost me the equivalent to zero-time this engine and configure it for what I have in mind, but at this point, I’ve almost got too much invested to just chuck it all and start over. Or, maybe somebody can build me a long block and I’ll finish the rest. But hey, at least I got to use my Lycoming cylinder wrenches once. In any event, Tim’s Aircraft Engines gets a call from me on Tuesday.